I moved my domain to upcloud on the other side of the world from Vultr sydney and could not be happier with the performance
Published on April 22, 2025 by Simon Fearby

I moved my domain to UpCloud (on the other side of the world) from Vultr (Sydney) and could not be happier with the performance. Here is what I did to set up a complete Ubuntu 18.04 system (NGINX, PHP, MySQL, WordPress etc). This is not a paid review (just me documenting my steps over 2 days).

Background (CPanel hosts)
In 1999 I hosted my first domain (www.fearby.com) on a host in Seattle (for $10 USD a month), the host used CPanel and all was good. After a decade I was using the domain more for online development and the website was now too slow (I think I was on dial-up or ADSL 1 at the time). I moved my domain to an Australian host (for $25 a month).
After 8 years the domain host was sold and performance remained mediocre. After another year the new host was sold again and performance was terrible.
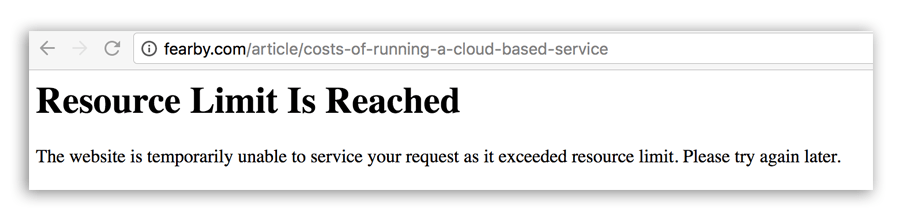
I started receiving Resource Limit Is Reached warnings (basically this was a plot by the new CPanel host to say “Pay us more and this message will go away”).
Page load times were near 30 seconds.
The straw that broke the camel’s back was their demand of $150/year for a dodgy SSL certificate.
I needed to move to a self-managed server where I was in control.
Buying a Domain Name
fyi: Youi can buy a domain name from https://porkbun.com/.
Search for a Self Managed Server (post CPanel)
I found a good web IDE ( http://www.c9.io/ ) that allowed me to connect to a cloud VM. C9 allowed me to open many files and terminal windows and reconnect to them later. Don’t get excited, though, as AWS has purchased C9 and it’s not the same.
I had a play with the C9 IDE to partialluy manage the a server
I spun up a Digital Ocean Server at the closest data centre in Singapore. Here was my setup guide creating a Digital Ocean VM, connecting to it with C9 and configuring it. I moved my email to G Suite and moved my WordPress to Digital Ocean (other guides here and here).
I was happy since I could now send emails via CLI/code, set up free SSL certs, add second domain email to G Suite and Secure G Suite. No more usage limit errors either.
Self-managing servers require more work but it is more rewarding (flexible, faster and cheaper). Page load times were now near 20 seconds (10-second improvement).
Latency Issue
Over 6 months, performance on Digital Ocean (in Singapore) from Australia started to drop (mentioned here). I tried upgrading the memory but that did not help (latency was king).
Moved the website to Australia
I moved my domain to Vultr in Australia (guide here and here). All was good for a year until traffic growth started to increase.
I tried upgrading the memory on Vultr and I setup PHP child workers, set up Cloudflare.
GT Metrix scores were about a “B” and Google Page Speed Scores were in the lower 40’s. Page loads were about 14 seconds (5-second improvement).
Tweaking WordPress
I set up an image compression plugin in WordPress then set up a cloud image compression and CDN Plugin from the same vendor. Page Speed info here.
GT Metrix scores were now occasionally an “A” and Page Speed scores were in the lower 20’s. Page loads were about 3-5 seconds (10-second improvement).
A mixed bag from Vultr (more optimisation and performance improvements were needed).
 "
>
"
>
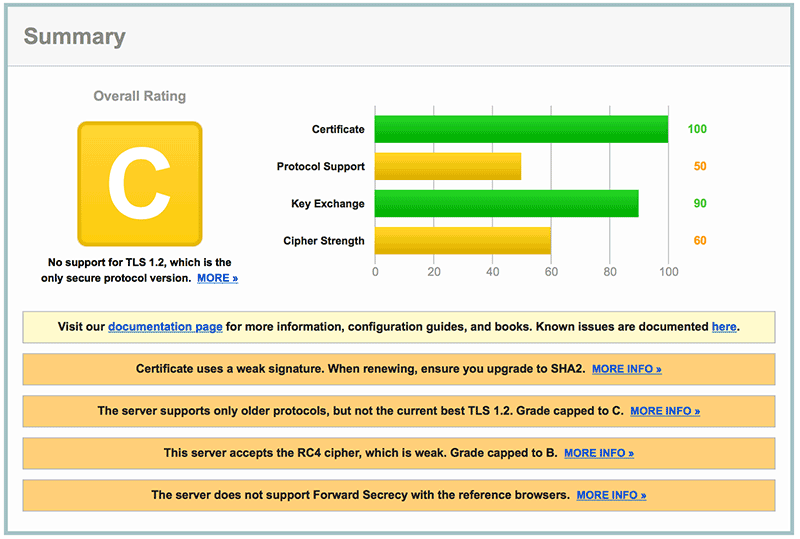
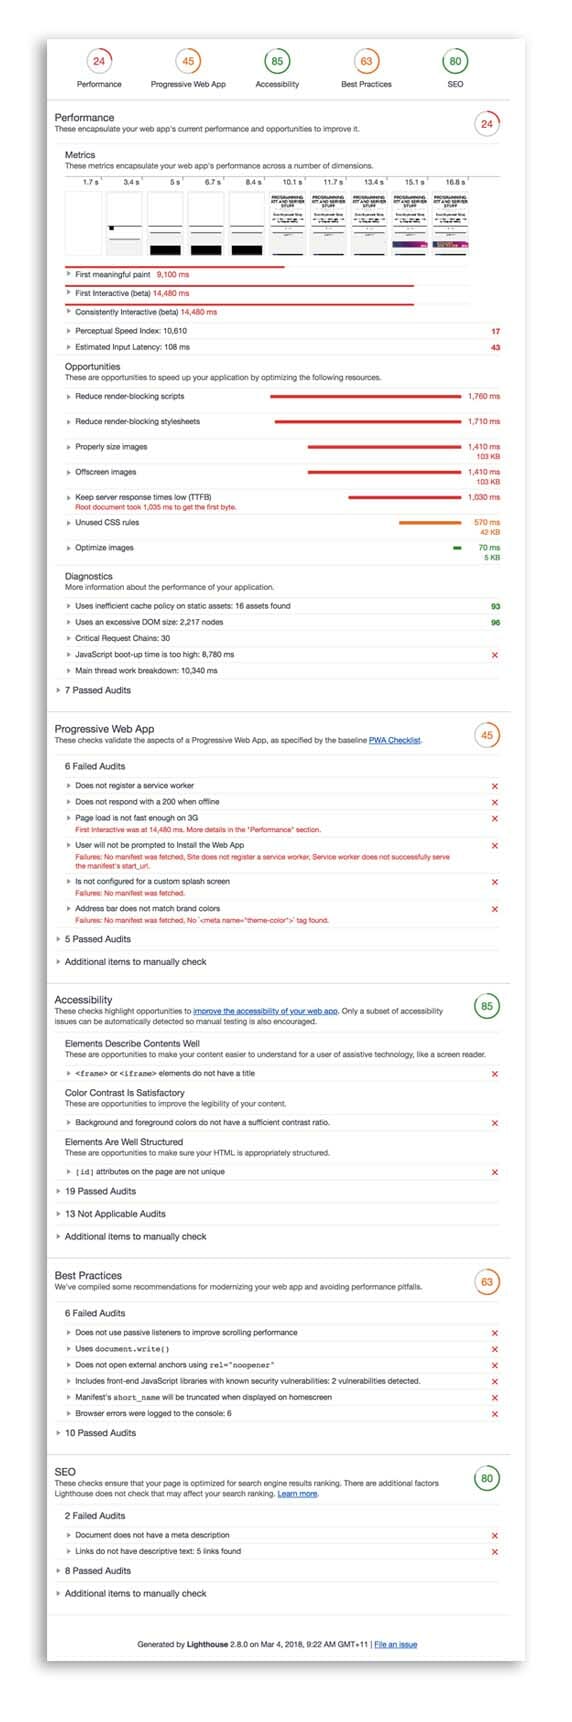
Google Chrome Developer Console Audit Results on Vultr hosted website were not very good (I stopped checking as nothing helped).
 "
>
"
>
The problem was the Vultr server (400km away in Sydney) was offline (my issue) and everything above (adding more memory, adding 2x CDN’s (EWWW and Cloudflare), adding PHP Child workers etc) did not seem to help???
Enter UpCloud…
Recently, a friend sent a link to a blog article about a host called “UpCloud” who promised “Faster than SSD” performance. This can’t be right: “Faster than SSD”? I was intrigued. I wanted to check it out as I thought nothing was faster than SSD (well, maybe RAM).
I signed up for a trial and ran a disk IO test (read the review here) and I was shocked. It’s fast. Very fast.
Summary: UpCloud was twice as fast (Disk IO and CPU) as Vultr (+ an optional $4/m firewall and $3/m for 1x backup).
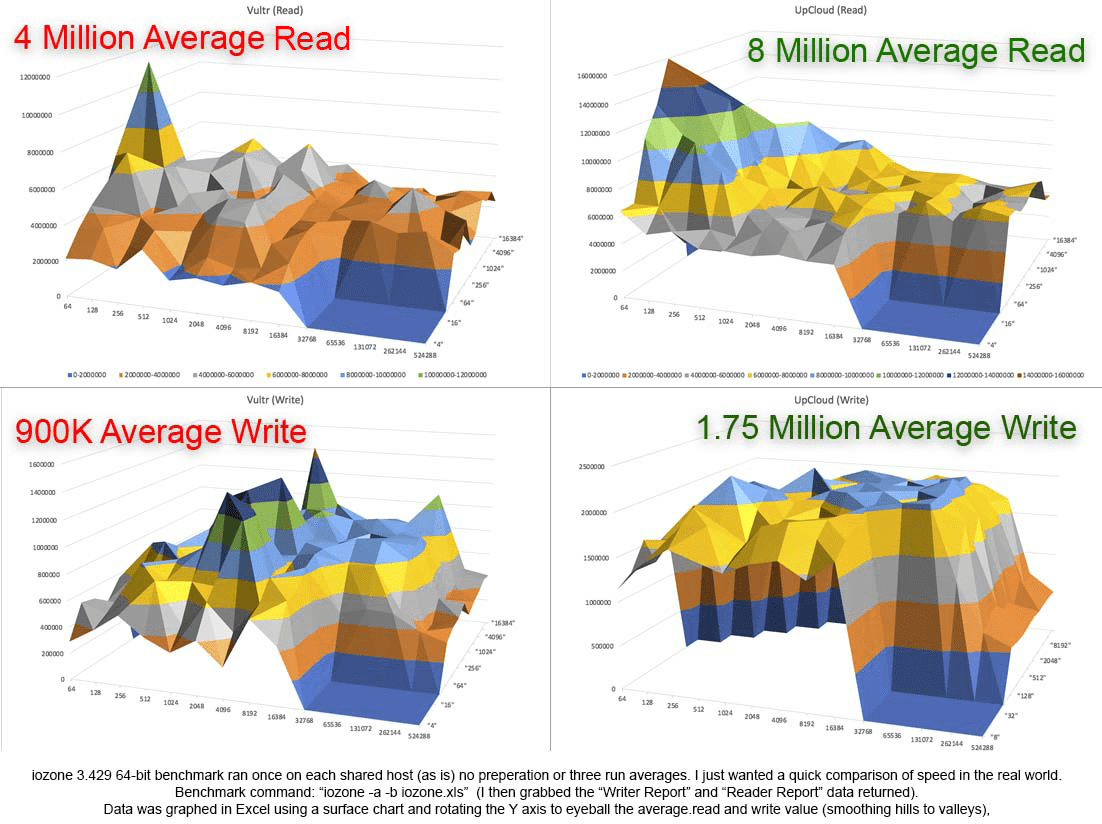
fyi: Labels above are K Bytes per second. iozone loops through all file size from 4 KB to 16,348 KB and measures through the reads per second. To be honest, the meaning of the numbers doesn’t interest me, I just want to compare apples to apples.

(image snip from http://www.iozone.org/ which explains the numbers)
I might have to copy my website on UpCloud and see how fast it is.
Where to Deploy and Pricing
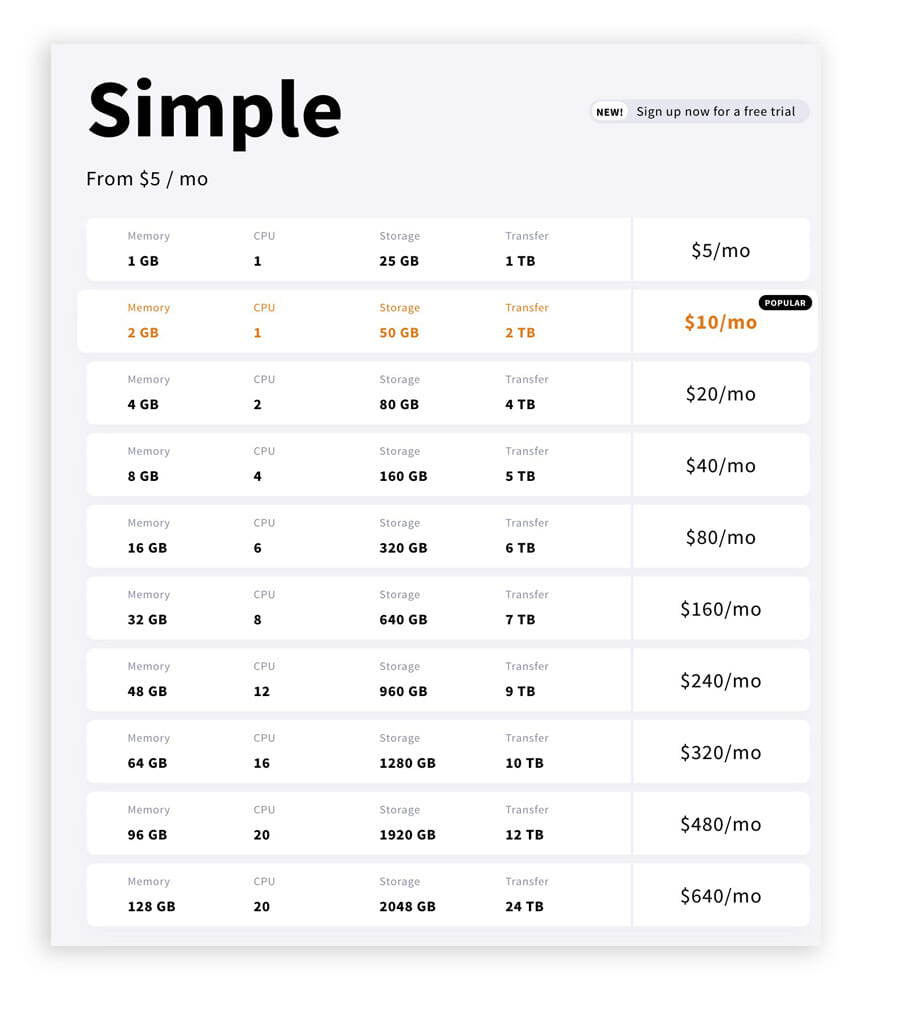
UpCloud Pricing: https://www.upcloud.com/pricing/
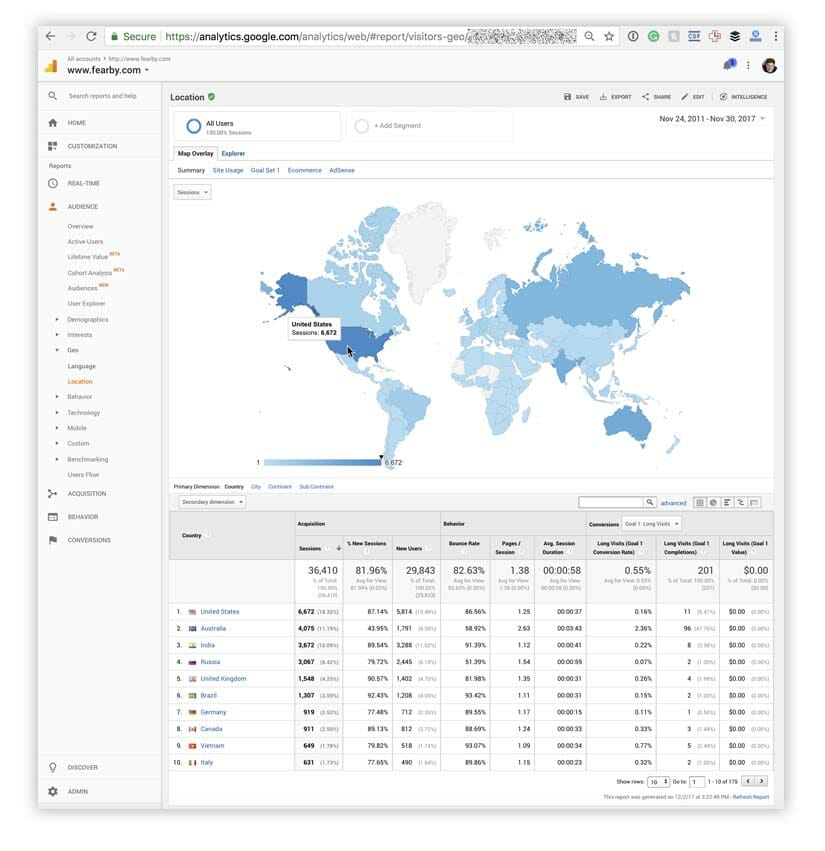
Most of my site’s visitors are based in the US and UpCloud have disk IO twice as fast as Vultr. I could deploy to Chicago?
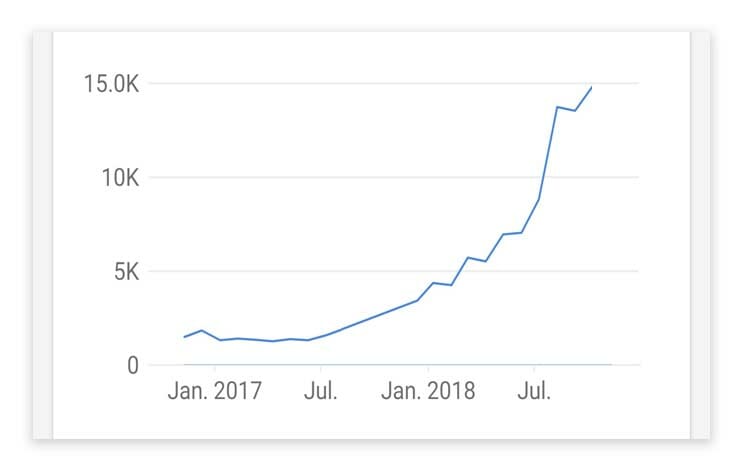
My site’s traffic is growing and I need to ensure the site is fast enough in the future.
Creating an UpCloud VM
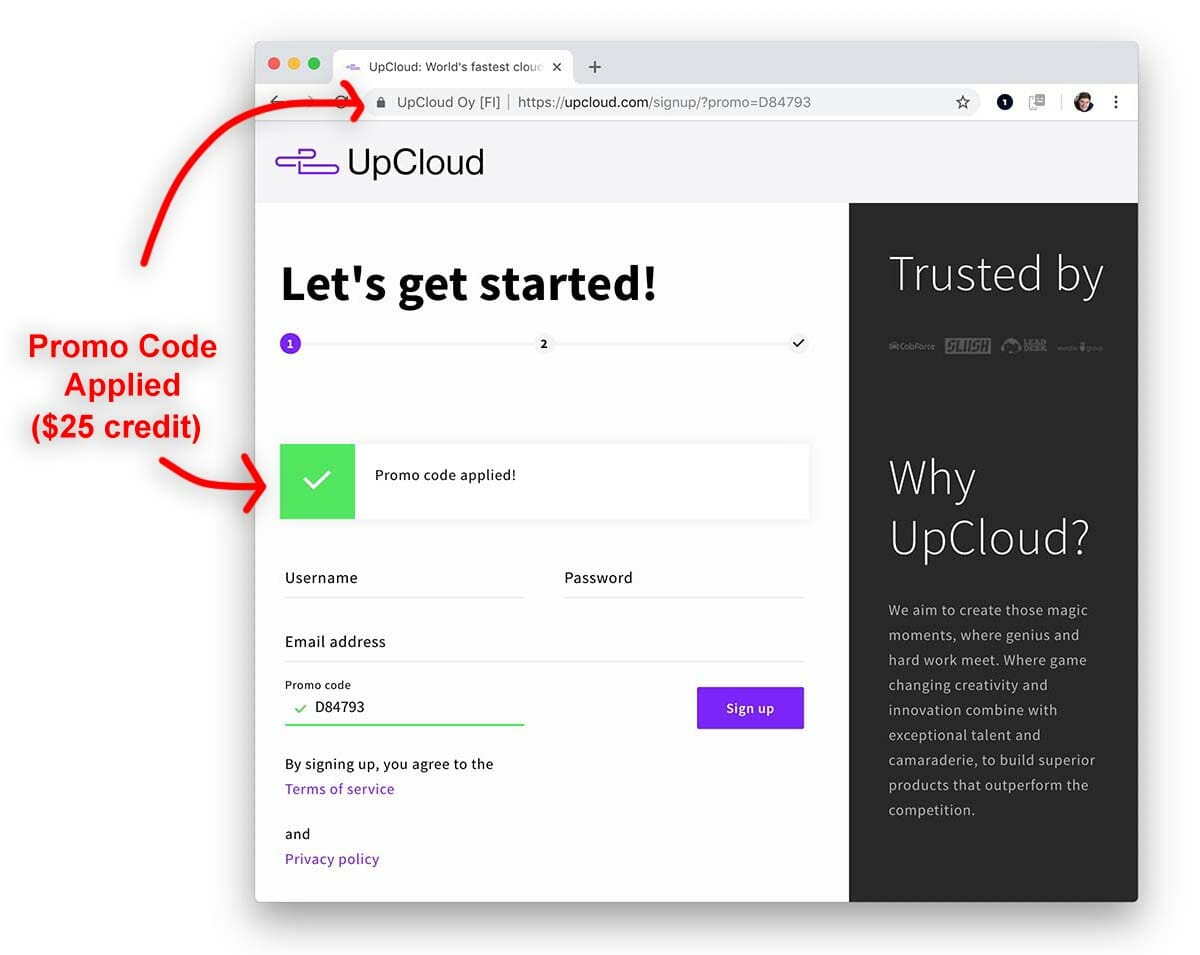
I used a friend’s referral code and signed up to create my first VM.
FYI: use my Referral code and get $25 free credit. Sign up only takes 2 minutes.
https://www.upcloud.com/register/?promo=D84793
When you click the link above you will receive 25$ to try out serves for 3 days. You can exit his trail and deposit $10 into UpCloud.
Trial Limitations
The trial mode restrictions are as following:
* Cloud servers can only be accessed using SSH, RDP, HTTP or HTTPS protocols
* Cloud servers are not allowed to send outgoing e-mails or to create outbound SSH/RDP connections
* The internet connection is restricted to 100 Mbps (compared to 500 Mbps for non-trial accounts)
* After your 72 hours free trial, your services will be deleted unless you make a one-time deposit of $10
UpCloud Links
The UpCloud support page is located here: https://www.upcloud.com/support/
- Quick start: Introduction to UpCloud
- How to deploy a Cloud Server
- Deploy a cloud server with UpCloud’s API
More UpCloud links to read:
- Two-Factor Authentication on UpCloud
- Floating IPs on UpCloud
- How to manage your firewall
- Finalizing deployment
Signing up to UpCloud
Navigate to https://upcloud.com/signup and add your username, password and email address and click signup.
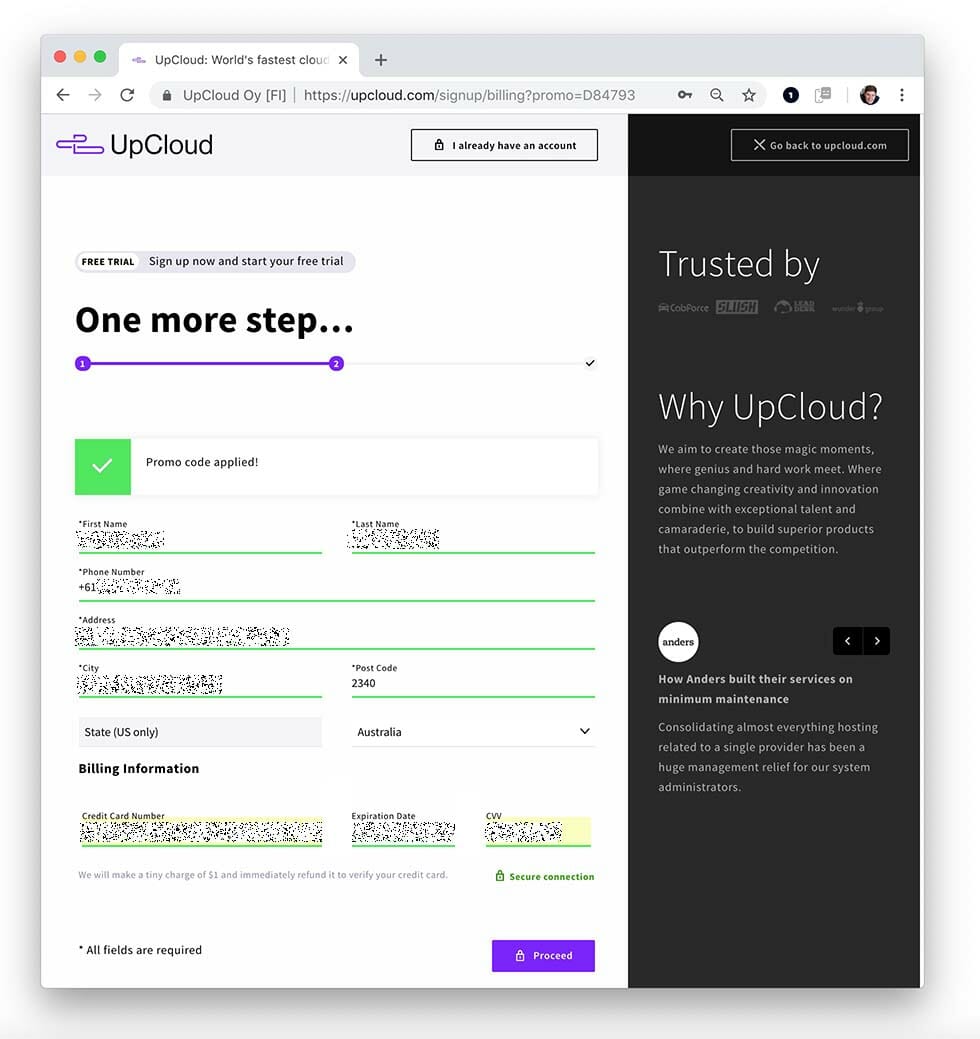
Add your address and payment details and click proceed (you don’t need to pay anything ($1 may be charged and instantly refunded to verify the card)
Proceed
That’s it, check yout email.
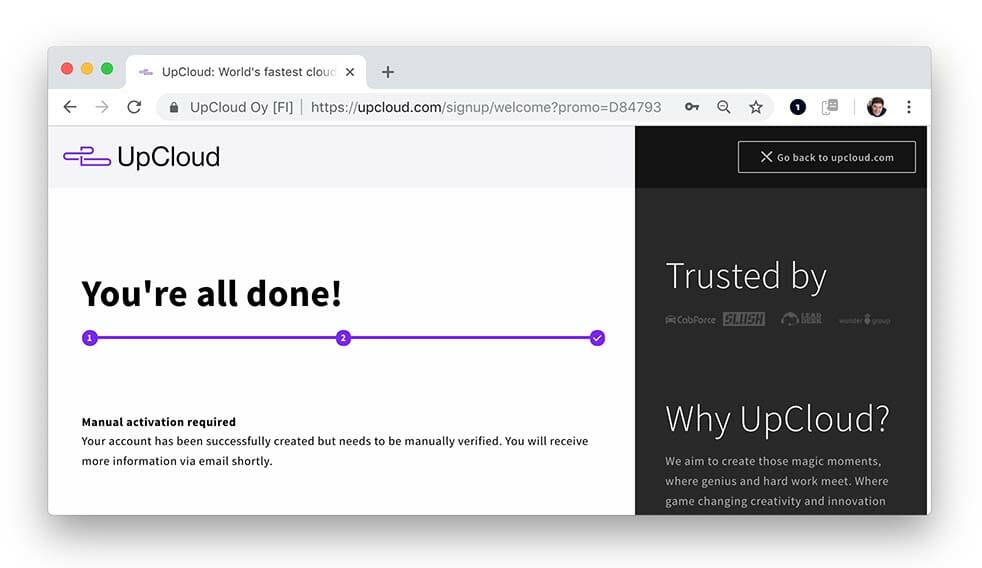
Look for the UpCloud email and click https://my.upcloud.com/

Now login

Now I can see a dashboard 🙂
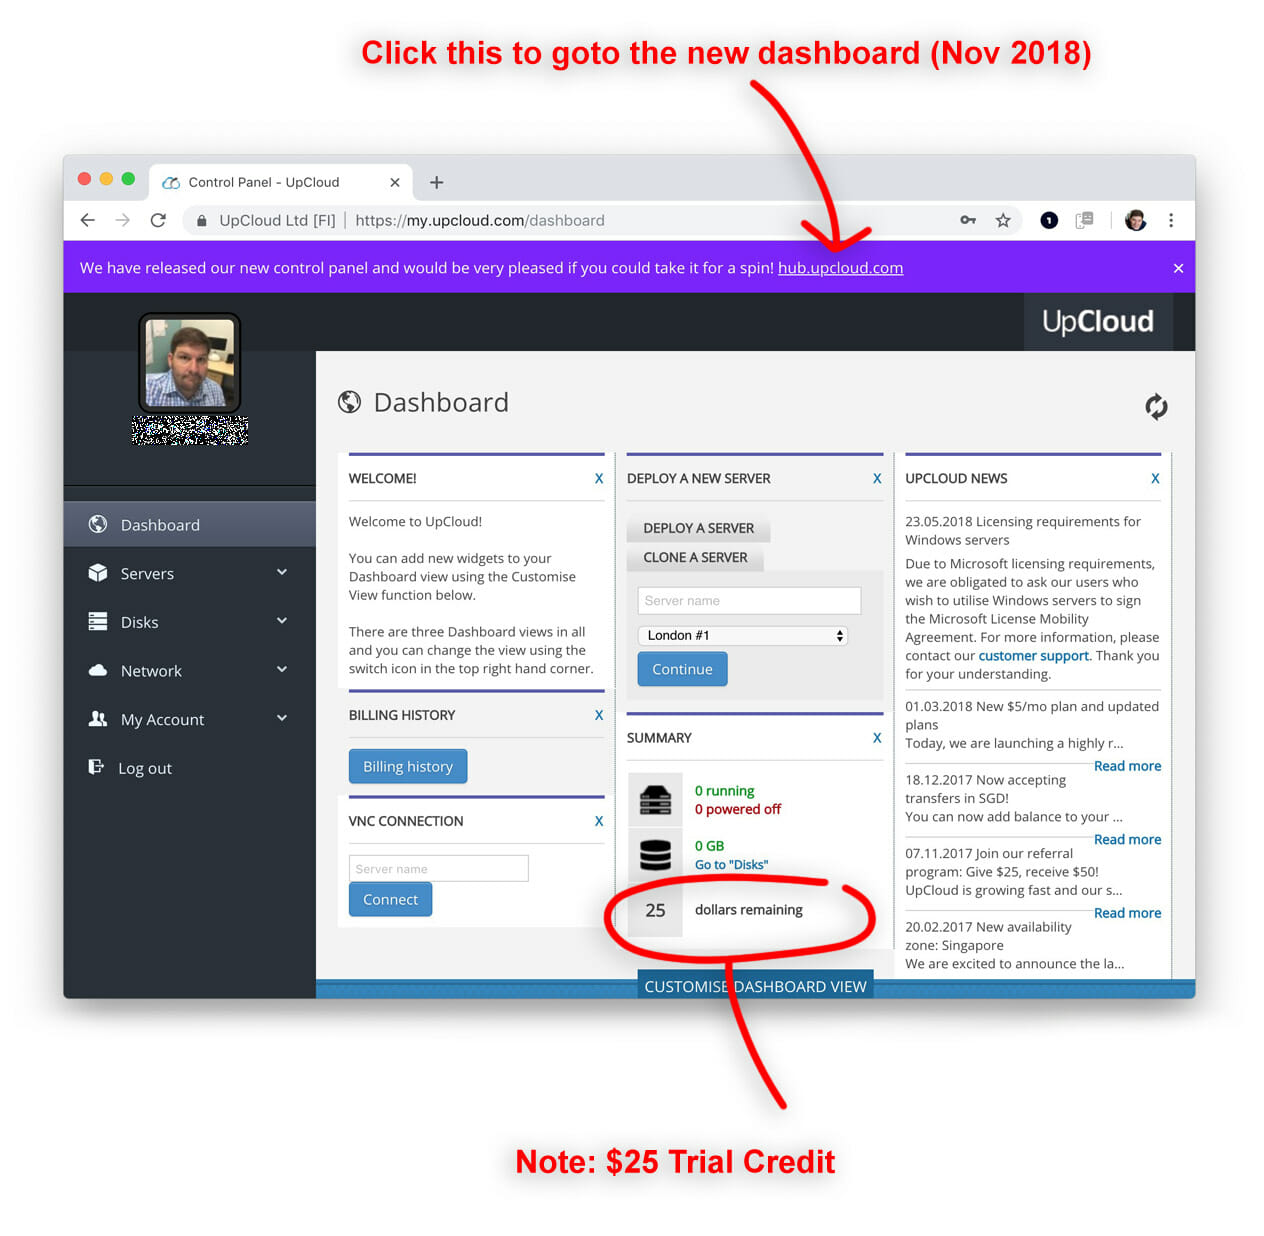
I was happy to see 24/7 support is available.
I opted in for the new dashboard
 "
>
"
>
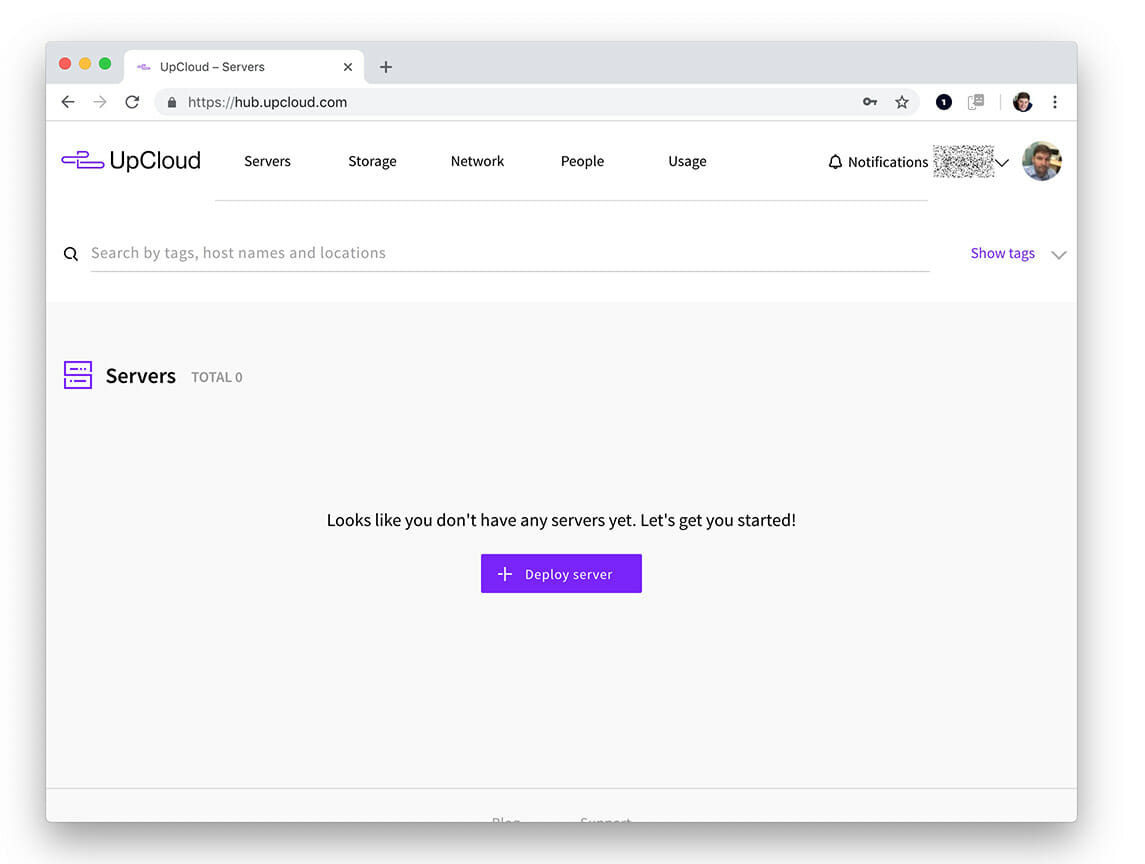
Deploy My First UpCloud Server
This is how I deployed a server.
Note: If you are going to deploy a server consider using my referral code and get $25 credit for free.
Under the “deploy a server” widget I named the server and chose a location (I think I was supposed to use an FQDN name -e.g., “fearby.com”). The deployment worked though. I clicked continue, then more options were made available:
- Enter a short server description.
- Choose a location (Frankfurt, Helsinki, Amsterdam, Singapore, London and Chicago)
- Choose the number of CPU’s and amount of memory
- Specify disk number/names and type (MaxIOPS or HDD).
- Choose an Operating System
- Select a Timezone
- Define SSH Keys for access
- Allowed login methods
- Choose hardware adapter types
- Where the send the login password
 "
>
"
>
Output
Generating public/private rsa key pair.
Enter file in which to save the key (/root/.ssh/id_rsa): /temp/example_rsa
Enter passphrase (empty for no passphrase): *********************************
Enter same passphrase again:*********************************
Your identification has been saved in /temp/example_rsa.
Your public key has been saved in /temp/example_rsa.pub.
The key fingerprint is:
SHA256:########################### user@sever
Outputted public and private key
Did the key export? (yes)
/temp
ls /temp/ -al
drwxr-xr-x 2 root root 4096 Jun 9 15:33 .
drwxr-xr-x 27 root root 4096 Jun 8 14:25 ..
-rw——- 1 user user 1766 Jun 9 15:33 example_rsa
-rw-r–r– 1 user user 396 Jun 9 15:33 example_rsa.pub
“example_rsa” is the private key and “example_rsa.pub “is the public key.

The public key needs to be added to the server to allow access.
The private key needs to be added to any local ssh program used for remote access.
Initialisation script (after deployment)
I was pleased to see an initialization script section that calls actions after the server is deployed. I configured the initialisation script to pull down a few GB of backups from my Vultr website in Sydney (files now removed).
This was my Initialisation script:
#!/bin/bash
echo "Downloading the Vultr websites backups"
mkdir /backup
cd /backup
wget -o www-mysql-backup.sql https://fearby.com/.../www-mysql-backup.sql
wget -o www-blog-backup.zip https://fearby.com/.../www-blog-backup.zip
Confirm and Deploy
I clicked “Confirm and deploy” but I had an alert that said trial mode can only deploy servers up to 1024MB of memory.

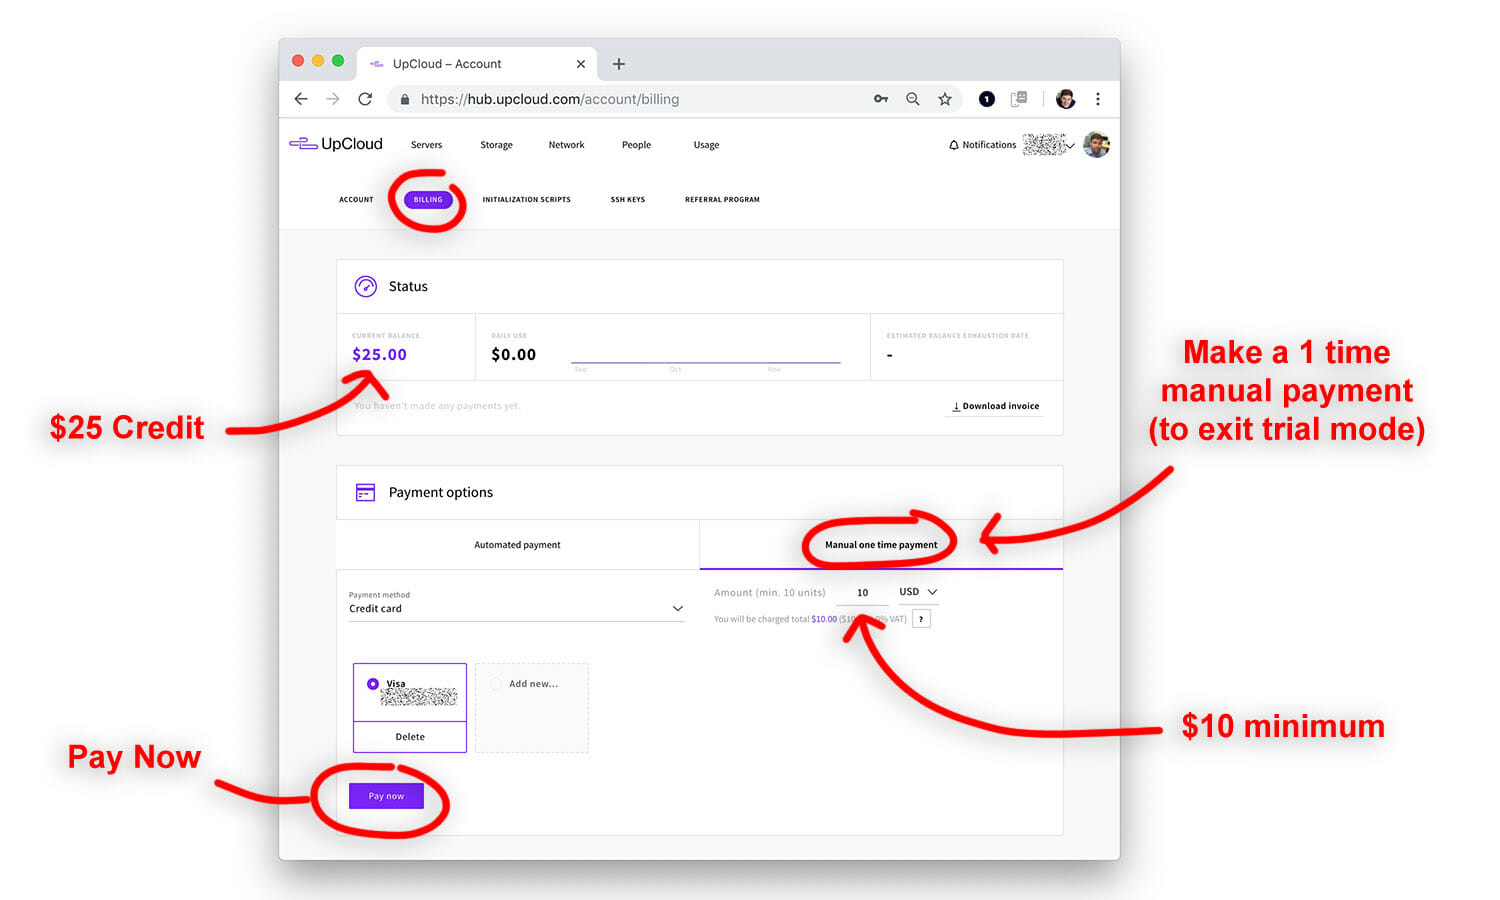
I opened the dashboard and clicked My Account then Billing, I could see the $25 referral credit but I guess I can’t use that in Trial.
I exited trial mode by depositing $10 (USD).
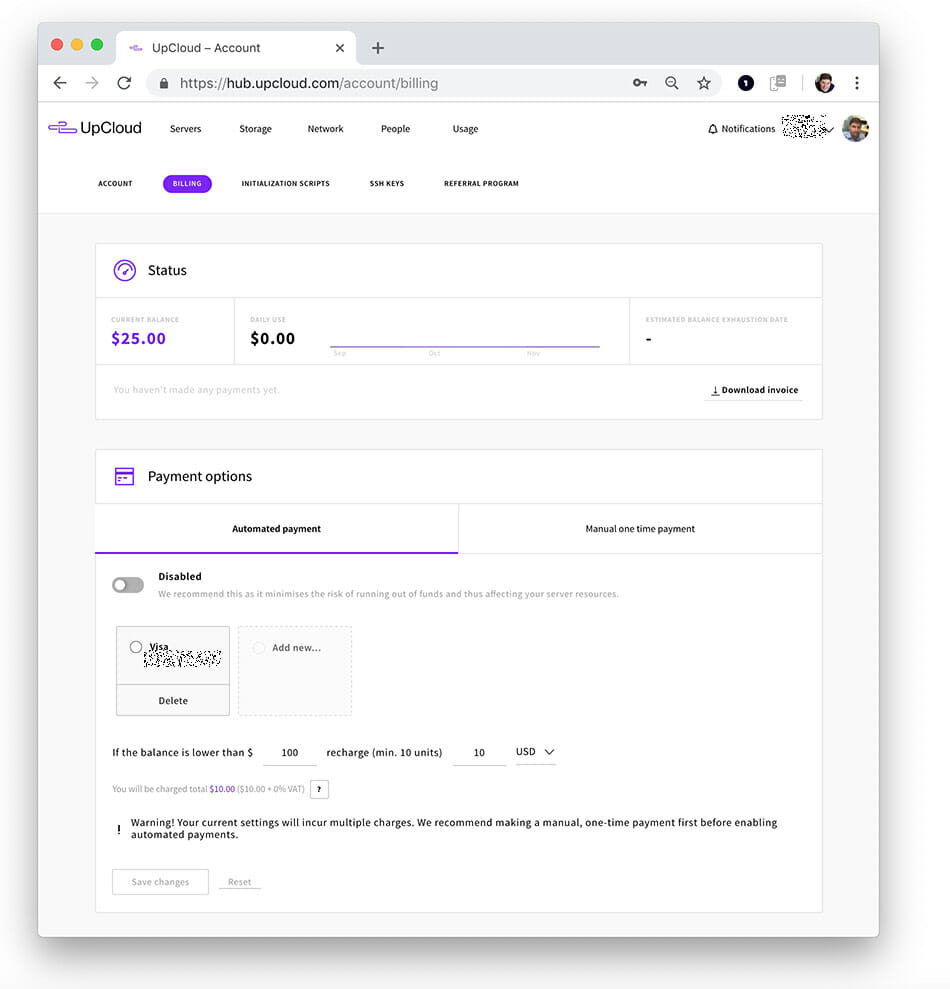
Make a manual 1-time deposit of $10 to exit trial mode.
FYI: Server prices are listed below (or view prices here).
Now I can go back and deploy the server with the same settings above (1x CPU, 2GB Memory, Ubuntu 18.04, MaxIOPS Storage etc)
Deployment takes a few minutes and depending on how you specified a password may be emailed to you.
UpCloud Server Deployed
The server is now deployed; now I can connect to it with my SSH program (vSSH). Simply add the server’s IP, username, password and the SSH private key (generated above) to your ssh program of choice.
fyi: The public key contents start with “ssh-rsa”.
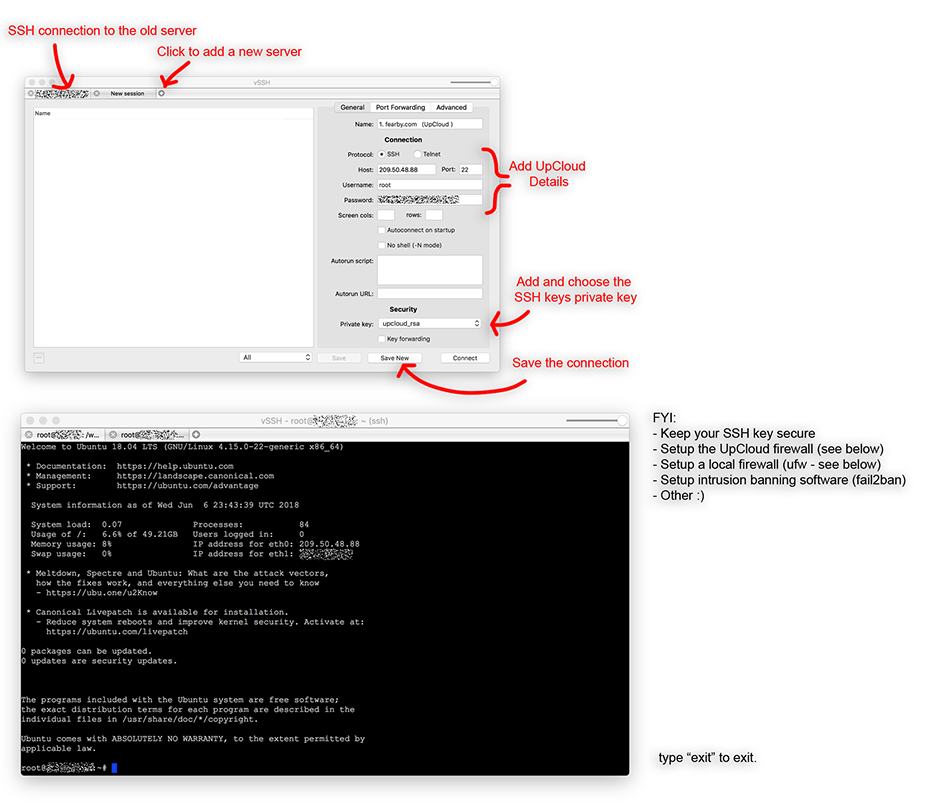
I noticed that the initialisation script downloaded my 2+GB of files already. Nice.
UpCloud Billing Breakdown
I can now see on the UpCloud billing page in my dashboard that credit is deducted daily (68c); at this rate, I have 49 days credit left?
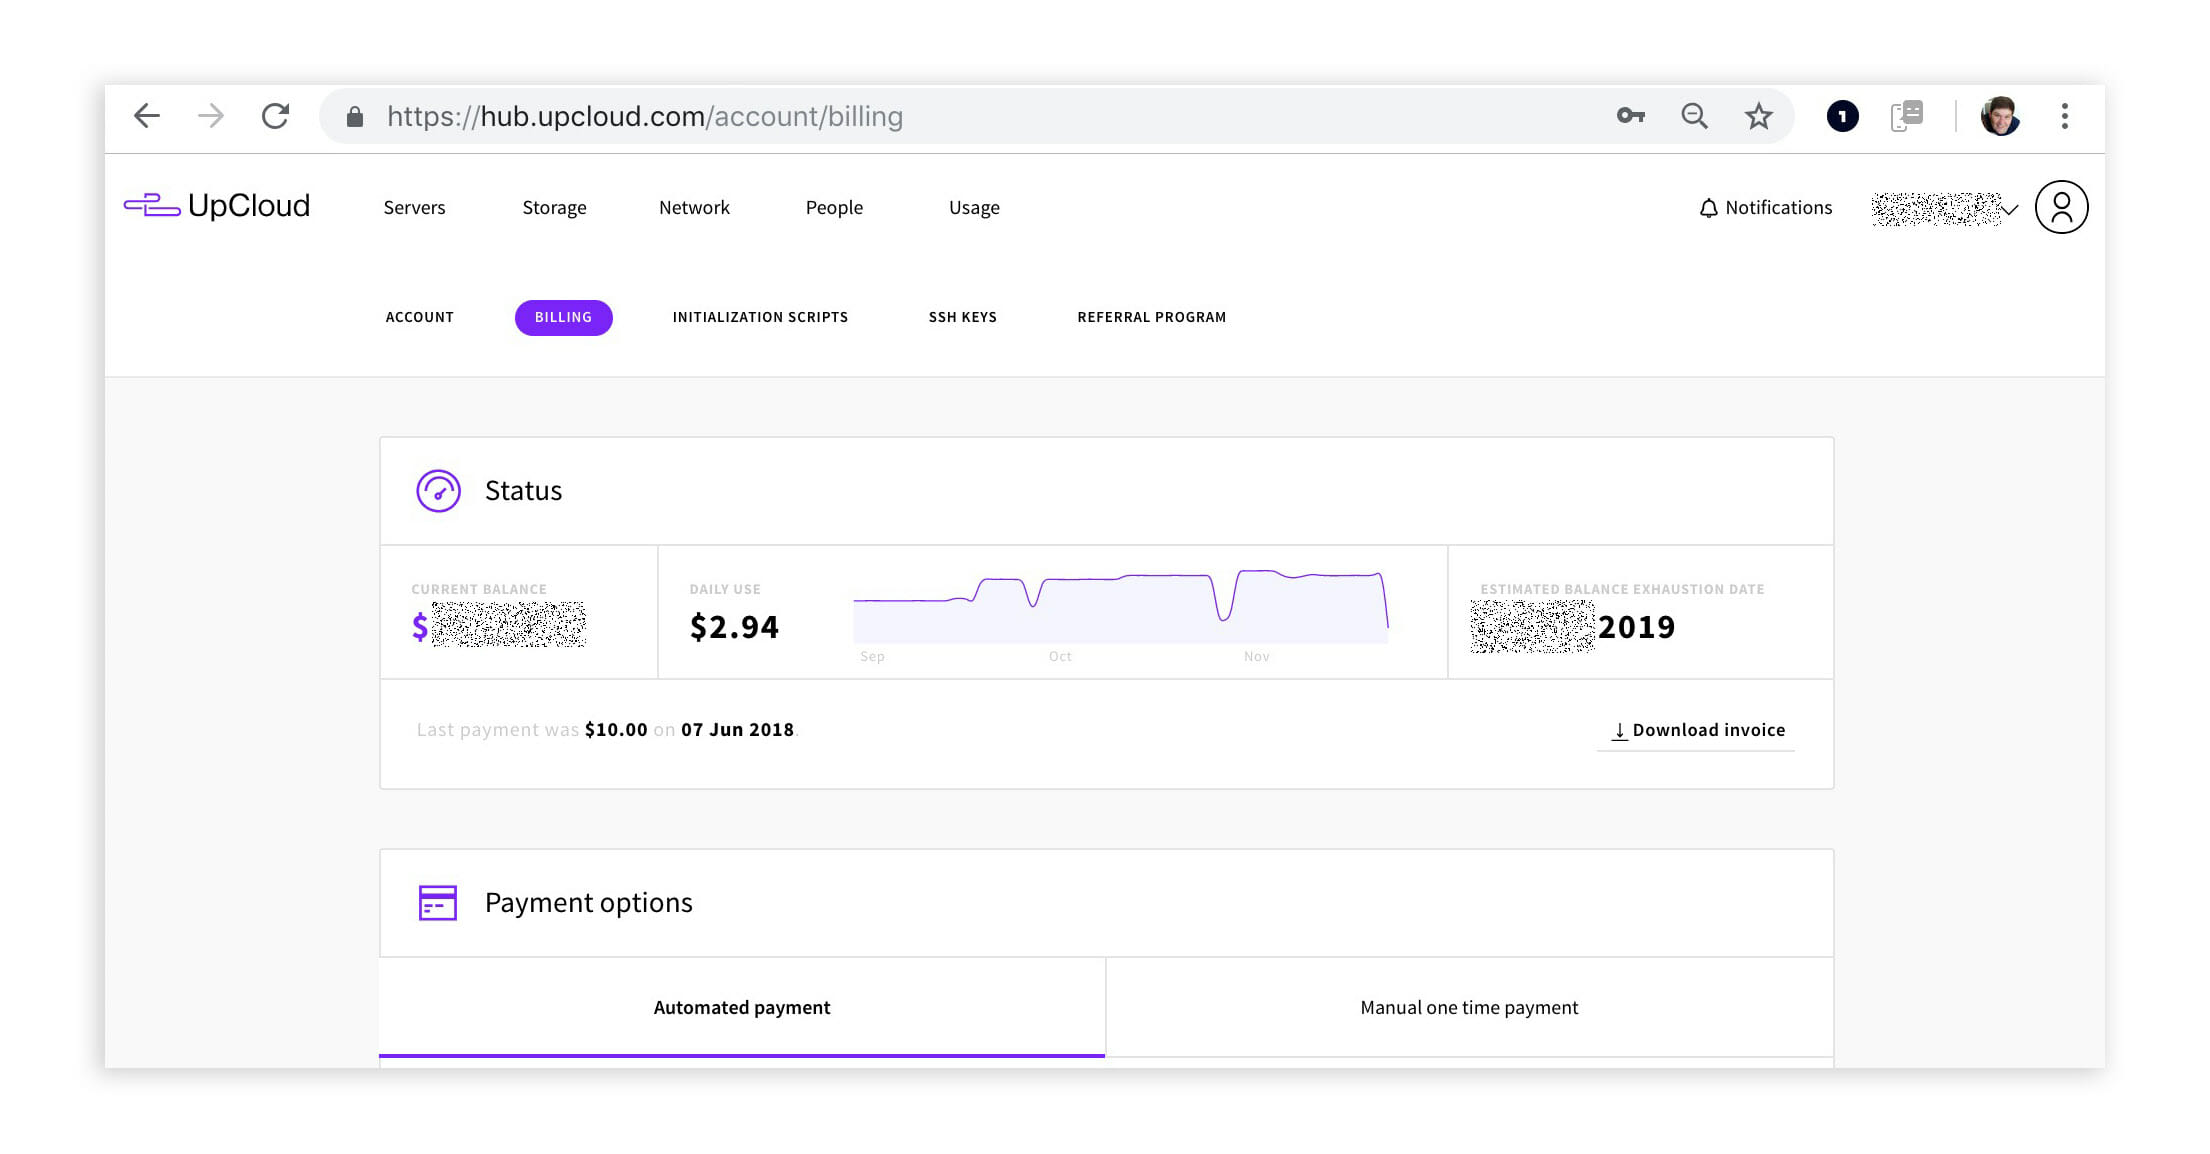
I can manually deposit funds or set up automatic payments at any time 🙂
UpCloud Backup Options
You do not need to setup backups but in case you want to roll back (if things stuff up), it is a good idea. Backups are an additional charge.
I have set up automatic daily backups with an auto deletion after 2 days
To view backup scheduled click on your deployed server then click backup
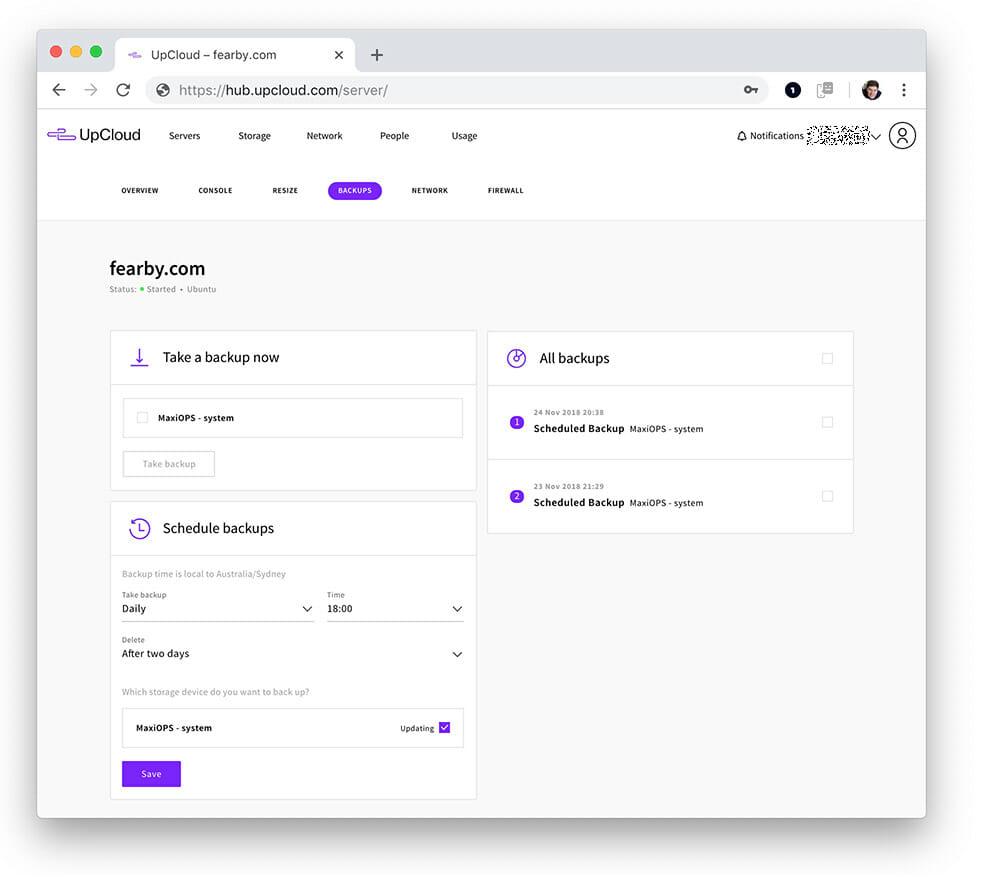
Note: Backups are charged at $0.056 for every GB stored – so $5.60 for every 100GB per month (half that for 50GB etc)
You can take manual backups at any time (and only be charged for the hour)
UpCloud Firewall Options
I set up a firewall at UpCloud to only allow the minimum number of ports (UpCloud DNS, HTTP, HTTPS and My IP to port 22). The firewall feature is charged at $0.0056 an hour ($4.03 a month)
I love the ability to set firewall rules on incoming, destination and outgoing ports.
To view your firewall click on your deployed server then click firewall
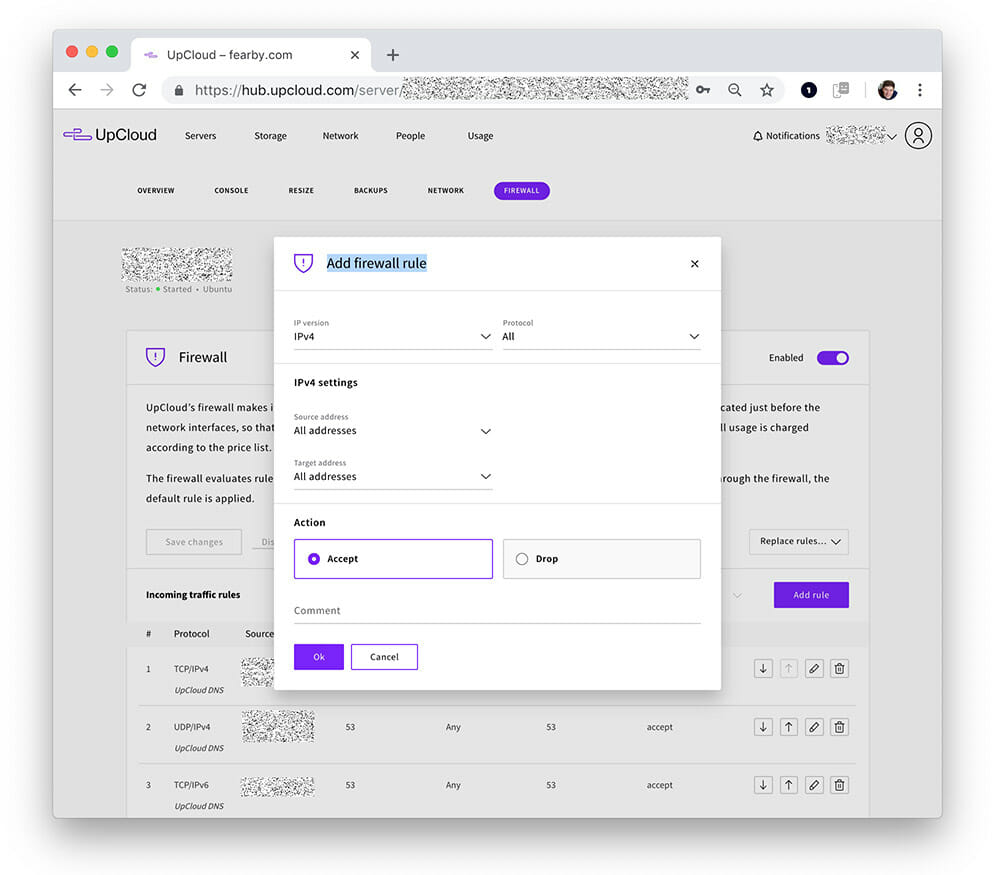
Update: I modified my firewall to allow inbound ICMP (IPv4/IPv6) and UDP (IPv4/IPv6) packets.
(Note: Old firewall screenshot)

Because my internet provider has a dynamic IP, I set up a VPN with a static IP and whitelisted it for backdoor access.
Local Ubuntu ufw Firewall
I duplicated the rules in my local ufw (2nd level) firewall (and blocked mail)
sudo ufw status numbered
Status: active

     To                         Action      From
     --                         ------      ----
[ 1] 80                         ALLOW IN    Anywhere
[ 2] 443                        ALLOW IN    Anywhere
[ 3] 25                         DENY OUT    Anywhere                   (out)
[ 4] 53                         ALLOW IN    93.237.127.9
[ 5] 53                         ALLOW IN    93.237.40.9
[ 6] 22                         ALLOW IN    REMOVED (MY WHITELISTED IP))
[ 7] 80 (v6)                    ALLOW IN    Anywhere (v6)
[ 8] 443 (v6)                   ALLOW IN    Anywhere (v6)
[ 9] 25 (v6)                    DENY OUT    Anywhere (v6)              (out)
[10] 53                         ALLOW IN    2a04:3540:53::1
[11] 53                         ALLOW IN    2a04:3544:53::1
UpCloud Download Speeds
I pulled down a 1.8GB Ubuntu 18.08 Desktop ISO 3 times from gigenet.com and the file downloaded in 32 seconds (57MB/sec). Nice.
$/temp# wget http://mirrors.gigenet.com/ubuntu/18.04/ubuntu-18.04-desktop-amd64.iso
--2018-06-08 18:02:04-- http://mirrors.gigenet.com/ubuntu/18.04/ubuntu-18.04-desktop-amd64.iso
Resolving mirrors.gigenet.com (mirrors.gigenet.com)... 69.65.15.34
Connecting to mirrors.gigenet.com (mirrors.gigenet.com)|69.65.15.34|:80... connected.
HTTP request sent, awaiting response... 200 OK
Length: 1921843200 (1.8G) [application/x-iso9660-image]
Saving to: 'ubuntu-18.04-desktop-amd64.iso'

ubuntu-18.04-desktop-amd64.iso 100%[==================================================================>] 1.79G 57.0MB/s in 32s

2018-06-08 18:02:37 (56.6 MB/s) - 'ubuntu-18.04-desktop-amd64.iso' saved [1921843200/1921843200]

$/temp# wget http://mirrors.gigenet.com/ubuntu/18.04/ubuntu-18.04-desktop-amd64.iso
--2018-06-08 18:02:46-- http://mirrors.gigenet.com/ubuntu/18.04/ubuntu-18.04-desktop-amd64.iso
Resolving mirrors.gigenet.com (mirrors.gigenet.com)... 69.65.15.34
Connecting to mirrors.gigenet.com (mirrors.gigenet.com)|69.65.15.34|:80... connected.
HTTP request sent, awaiting response... 200 OK
Length: 1921843200 (1.8G) [application/x-iso9660-image]
Saving to: 'ubuntu-18.04-desktop-amd64.iso.1'

ubuntu-18.04-desktop-amd64.iso.1 100%[==================================================================>] 1.79G 57.0MB/s in 32s

2018-06-08 18:03:19 (56.6 MB/s) - 'ubuntu-18.04-desktop-amd64.iso.1' saved [1921843200/1921843200]

$/temp# wget http://mirrors.gigenet.com/ubuntu/18.04/ubuntu-18.04-desktop-amd64.iso
--2018-06-08 18:03:23-- http://mirrors.gigenet.com/ubuntu/18.04/ubuntu-18.04-desktop-amd64.iso
Resolving mirrors.gigenet.com (mirrors.gigenet.com)... 69.65.15.34
Connecting to mirrors.gigenet.com (mirrors.gigenet.com)|69.65.15.34|:80... connected.
HTTP request sent, awaiting response... 200 OK
Length: 1921843200 (1.8G) [application/x-iso9660-image]
Saving to: 'ubuntu-18.04-desktop-amd64.iso.2'

ubuntu-18.04-desktop-amd64.iso.2 100%[==================================================================>] 1.79G 57.0MB/s in 32s

2018-06-08 18:03:56 (56.8 MB/s) - 'ubuntu-18.04-desktop-amd64.iso.2' saved [1921843200/1921843200]
I installed common Ubuntu packages.
apt-get install zip htop ifstat iftop bmon tcptrack ethstatus speedometer iozone3 bonnie++ sysbench siege tree tree unzip jq jq ncdu pydf ntp rcconf ufw iperf nmap iozone3
I checked the server’s time (I thought this was auto set before I deployed)?
$hwclock --show
      2018-06-06 23:52:53.639378+0000
I reset the time to Australia/Sydney.
dpkg-reconfigure tzdata
      Current default time zone: 'Australia/Sydney'
      Local time is now: Thu Jun 7 06:53:20 AEST 2018.
      Universal Time is now: Wed Jun 6 20:53:20 UTC 2018.
Now the timezone is set 🙂
Shell History
I increased the shell history.
HISTSIZEH =10000
      HISTCONTROL=ignoredups
I created a ~/.ssh/authorized_keys file and added my SSH public key to allow password-less logins.
mkdir ~/.ssh
sudo nano ~/.ssh/authorized_keys
I added my pubic ssh key, then exited the ssh session and logged back in. I can now log in without a password.
Install NGINX
apt-get install nginx
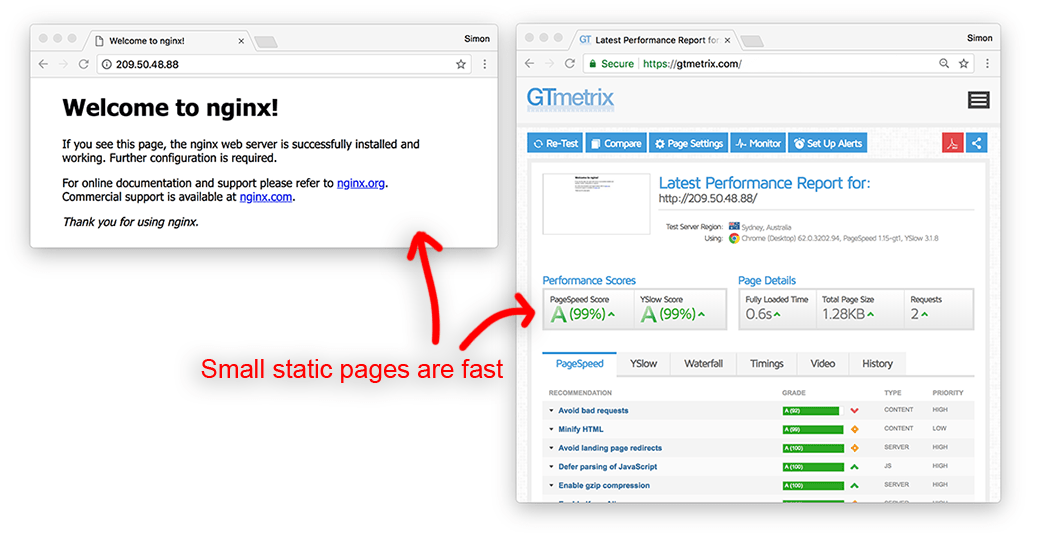
nginx/1.14.0 is now installed.
A quick GT Metrix test.
Install MySQL
Run these commands to install and secure MySQL.
apt install mysql-server
mysql_secure_installation
Securing the MySQL server deployment.
Would you like to setup VALIDATE PASSWORD plugin?: n
New password: **********************************************
Re-enter new password: **********************************************
Remove anonymous users? (Press y|Y for Yes, any other key for No) : y
Disallow root login remotely? (Press y|Y for Yes, any other key for No) : y
Remove test database and access to it? (Press y|Y for Yes, any other key for No) : y
Reload privilege tables now? (Press y|Y for Yes, any other key for No) : y
Success.
I disabled the validate password plugin because I hate it.
MySQL Ver 14.14 Distrib 5.7.22 is now installed.
Set MySQL root login password type
mysql
SELECT user,authentication_string,plugin,host FROM mysql.user;
+------------------+-------------------------------------------+-----------------------+-----------+
| user | authentication_string | plugin | host |
+------------------+-------------------------------------------+-----------------------+-----------+
| root | | auth_socket | localhost |
| mysql.session | hiddden | mysql_native_password | localhost |
| mysql.sys | hiddden | mysql_native_password | localhost |
| debian-sys-maint | hiddden | mysql_native_password | localhost |
+------------------+-------------------------------------------+-----------------------+----------
Now let’s set the root password authentication method to “mysql_native_password”
ALTER USER 'root'@'localhost' IDENTIFIED WITH mysql_native_password BY '*****************************************';
      Query OK, 0 rows affected (0.00 sec)
Check authentication method.
mysql> SELECT user,authentication_string,plugin,host FROM mysql.user;
      +------------------+-------------------------------------------+-----------------------+-----------+
      | user | authentication_string | plugin | host |
      +------------------+-------------------------------------------+-----------------------+-----------+
      | root | ######################################### | mysql_native_password | localhost |
      | mysql.session | hiddden | mysql_native_password | localhost |
      | mysql.sys | hiddden | mysql_native_password | localhost |
      | debian-sys-maint | hiddden | mysql_native_password | localhost |
      +------------------+-------------------------------------------+-----------------------+-----------+
Now we need to flush permissions.
mysql> FLUSH PRIVILEGES;
      Query OK, 0 rows affected (0.00 sec)
Done.
Install PHP
Install PHP 7.2
apt-get install software-properties-common
      add-apt-repository ppa:ondrej/php
      apt-get update
      apt-get install -y php7.2
      php -v
I made the following changes in /etc/php/7.2/fpm/php.ini
> cgi.fix_pathinfo=0
> max_input_vars = 1000
> memory_limit = 1024M
> max_file_uploads = 20M
> post_max_size = 20M
Install PHP Modules
sudo apt-get install php-pear php7.2-curl php7.2-dev php7.2-mbstring php7.2-zip php7.2-mysql php7.2-xml
Install PHP FPM
apt-get install php7.2-fpm
Configure PHP FPM config.
Edit /etc/php/7.2/fpm/php.ini
> cgi.fix_pathinfo=0
> max_input_vars = 1000
> memory_limit = 1024M
> max_file_uploads = 20M
> post_max_size = 20M
Reload php sudo service.
php7.2-fpm restart service php7.2-fpm status
Install PHP Modules
sudo apt-get install php-pear php7.2-curl php7.2-dev php7.2-mbstring php7.2-zip php7.2-mysql php7.2-xml
Configuring NGINX
If you are not comfortable editing NGINX config files read here, here and here.
I made a new “www root” folder, set permissions and created a default html file.
mkdir /www-root
chown -R www-data:www-data /www-root
echo "Hello World" >> /www-root/index.html
I edited the “root” key in “/etc/nginx/sites-enabled/default” file and set the root a new location (e.g., “/www-root”)
I added these performance tweaks to /etc/nginx/nginx.conf
> worker_cpu_affinity auto;
> worker_rlimit_nofile 100000
I add the following lines to “http {” section in /etc/nginx/nginx.conf
client_max_body_size 10M;

gzip on;
gzip_disable "msie6";
gzip_comp_level 5;
gzip_min_length 256;
gzip_vary on;
gzip_types
application/atom+xml
application/ld+json
application/manifest+json
application/rss+xml
application/vnd.geo+json
application/vnd.ms-fontobject
application/x-font-ttf
application/x-web-app-manifest+json
application/xhtml+xml
font/opentype
image/bmp
image/x-icon
text/cache-manifest
text/vcard
text/vnd.rim.location.xloc
text/vtt
text/x-component
text/x-cross-domain-policy;
#text/html is always compressed by gzip module

gzip_proxied any;
gzip_buffers 16 8k;
gzip_http_version 1.1;
gzip_types text/plain text/css application/json application/javascript text/xml application/xml application/xml+rss
Check NGINX Status
service nginx status
* nginx.service - A high performance web server and a reverse proxy server
Loaded: loaded (/lib/systemd/system/nginx.service; enabled; vendor preset: enabled)
Active: active (running) since Thu 2018-06-07 21:16:28 AEST; 30min ago
Docs: man:nginx(8)
Main PID: # (nginx)
Tasks: 2 (limit: 2322)
CGroup: /system.slice/nginx.service
|- # nginx: master process /usr/sbin/nginx -g daemon on; master_process on;
`- # nginx: worker process
Install Open SSL that supports TLS 1.3
This is a work in progress. The steps work just fine for me on Ubuntu 16.04. but not Ubuntu 18.04.?
Installing Adminer MySQL GUI
I will use the PHP based Adminer MySQL GUI to export and import my blog from one server to another. All I needed to do is install it on both servers (simple 1 file download)
cd /utils
wget -o adminer.php https://github.com/vrana/adminer/releases/download/v4.6.2/adminer-4.6.2-mysql-en.php
On the original server open Adminer (http) and..
- Login with the MySQL root account
- Open your database
- Choose “Save” as the output
- Click on Export
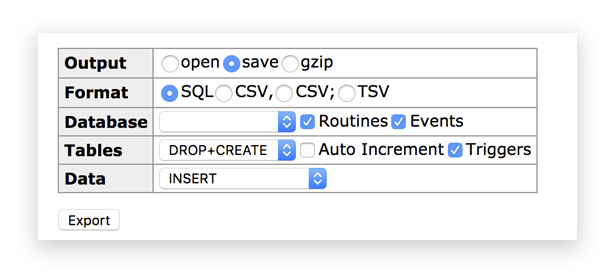
Save the “.sql” file.
I used Adminer on the UpCloud server to Import My Blog
FYI: Depending on the size of your database backup you may need to temporarily increase your upload and post sizes limits in PHP and NGINX before you can import your database.
Edit /etc/php/7.2/fpm/php.ini
> max_file_uploads = 100M
> post_max_size =100M
And Edit: /etc/nginx/nginx.conf
> client_max_body_size 100M;
Don’t forget to reload NGINX config and restart NGINX and PHP. Take note of the maximum allowed file size in the screenshot below. I temporarily increased my upload limits to 100MB in order to restore my 87MB blog.
Now I could open Adminer on my UpCloud server.
- Create a new database
- Click on the database and click Import
- Choose the SQL file
- Click Execute to import it
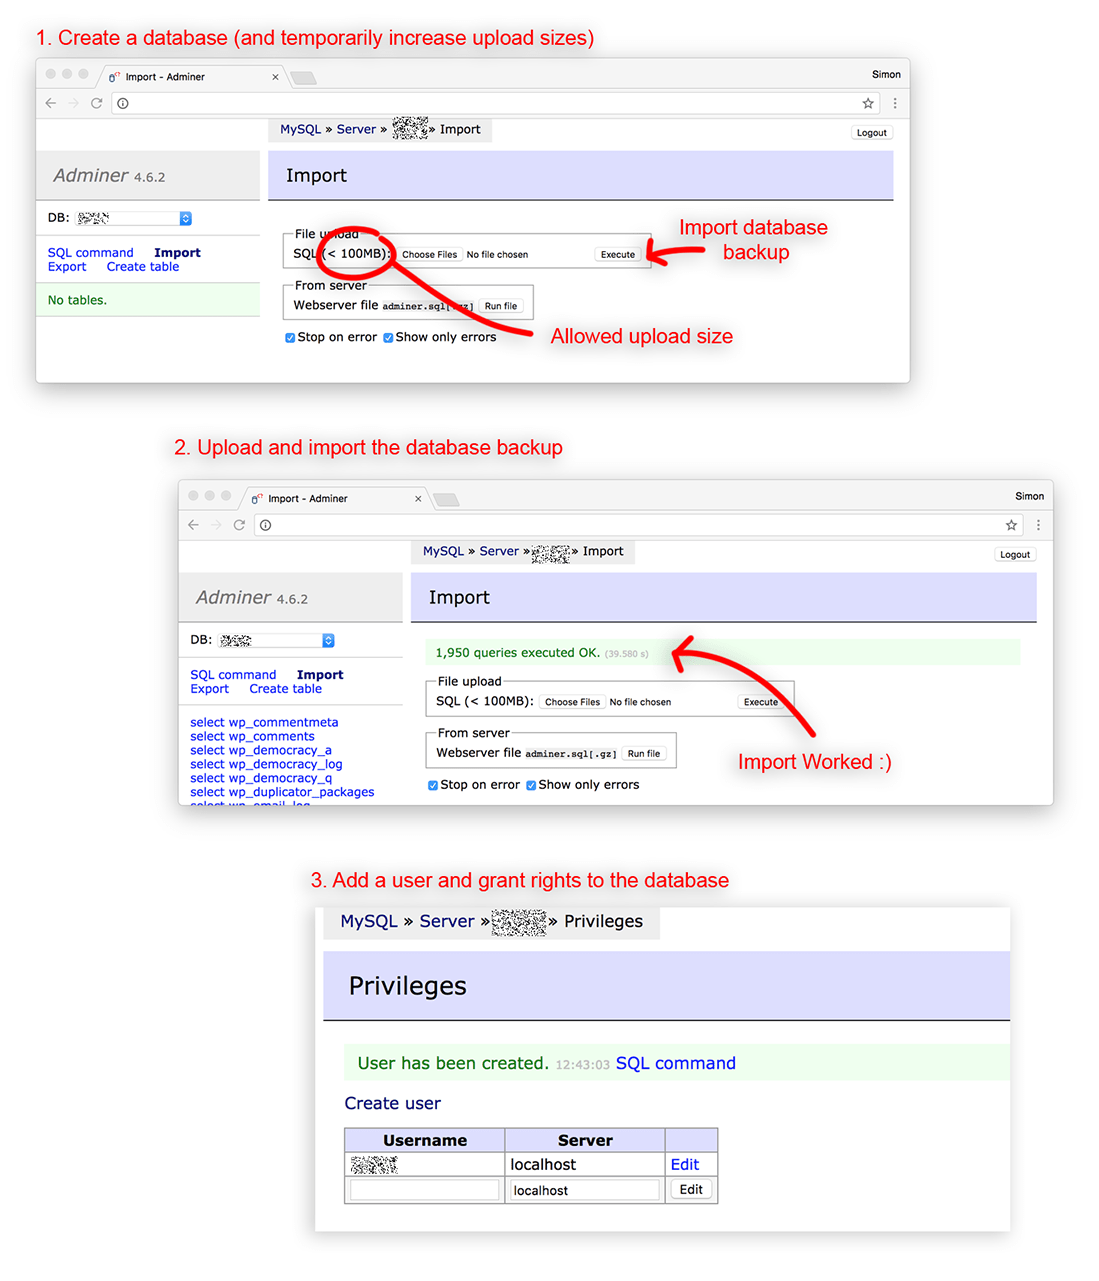
Don’t forget to create a user and assign permissions (as required – check your wp-config.php file).
Tip: Don’t forget to lower the maximum upload file size and max post size after you import your database,
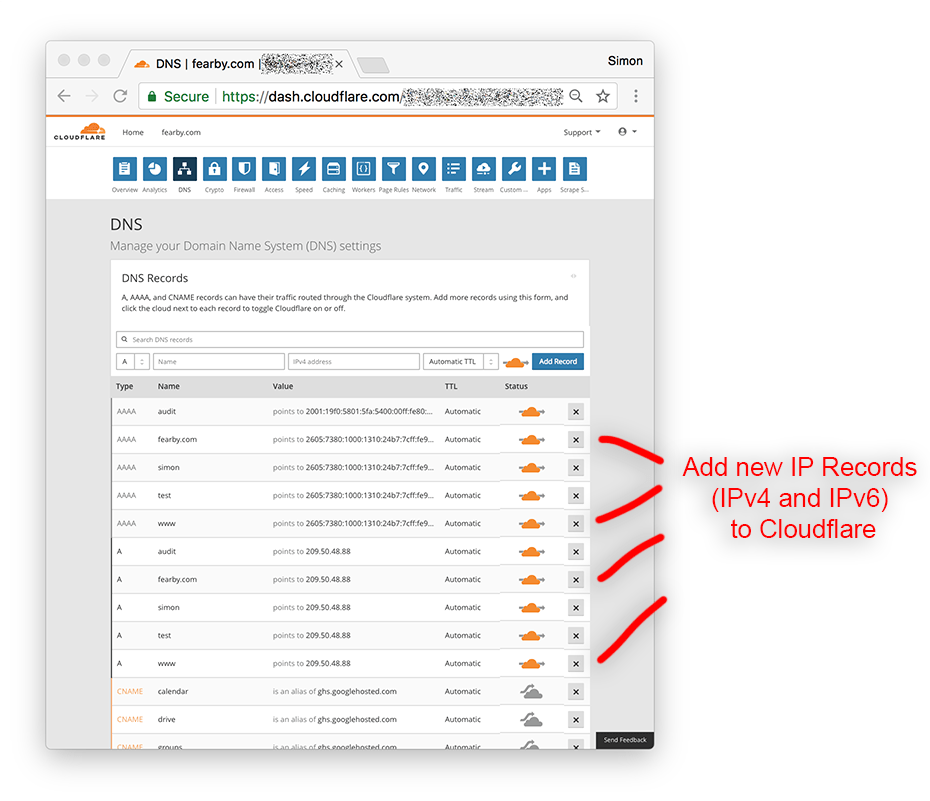
Cloudflare DNS
I use Cloudflare to manage DNS, so I need to tell it about my new server.
You can get your server’s IP details from the UpCloud dashboard.

At Cloudflare update your DNS details to point to the server’s new IPv4 (“A Record”) and IPv6 (“AAAA Record”).
Domain Error
I waited an hour and my website was suddenly unavailable. At first, I thought this was Cloudflare forcing the redirection of my domain to HTTP (that was not yet set up).
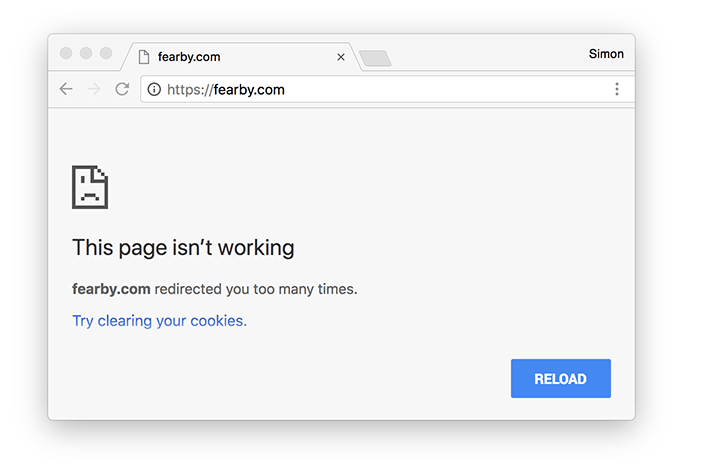
I chatted with UpCloud chat on their webpage and they kindly assisted me to diagnose all the common issues like DNS values, DNS replication, Cloudflare settings and the error was pinpointed to my NGINX installation. All NGINX config settings were ok from what we could see? I uninstalled NGINX and reinstalled it (and that fixed it). Thanks UpCloud Support 🙂
Reinstalled NGINX
sudo apt-get purge nginx nginx-common
I reinstalled NGINX and reconfigured /etc/nginx/nginx.conf (I downloaded my SSL cert from my old server just in case).
Here is my /etc/nginx/nginx.conf file.
user www-data;
worker_processes auto;
worker_cpu_affinity auto;
pid /run/nginx.pid;
include /etc/nginx/modules-enabled/*.conf;
error_log /var/log/nginx/www-nginxcriterror.log crit;

events {
        worker_connections 768;
        multi_accept on;
}

http {

        client_max_body_size 10M;
        sendfile on;
        tcp_nopush on;
        tcp_nodelay on;
        keepalive_timeout 65;
        types_hash_max_size 2048;
        server_tokens off;

        server_names_hash_bucket_size 64;
        server_name_in_redirect off;

        include /etc/nginx/mime.types;
        default_type application/octet-stream;

        ssl_protocols TLSv1.1 TLSv1.2;
        ssl_prefer_server_ciphers on;

        access_log /var/log/nginx/www-access.log;
        error_log /var/log/nginx/www-error.log;

        gzip on;

        gzip_vary on;
        gzip_disable "msie6";
        gzip_min_length 256;
        gzip_proxied any;
        gzip_comp_level 6;
        gzip_buffers 16 8k;
        gzip_http_version 1.1;
        gzip_types text/plain text/css application/json application/javascript text/xml application/xml application/xml+rss text/javascript;

        include /etc/nginx/conf.d/*.conf;
        include /etc/nginx/sites-enabled/*;
}
Here is my /etc/nginx/sites-available/default file (fyi, I have not fully re-setup TLS 1.3 yet so I commented out the settings)
proxy_cache_path /tmp/nginx-cache keys_zone=one:10m;#
server {
        root /www-root;

        # Listen Ports
        listen 80 default_server http2;
        listen [::]:80 default_server http2;
        listen 443 ssl default_server http2;
        listen [::]:443 ssl default_server http2;

        # Default File
        index index.html index.php index.htm;

        # Server Name
        server_name www.fearby.com fearby.com localhost;

        # HTTPS Cert
        ssl_certificate /etc/nginx/ssl-cert-path/fearby.crt;
        ssl_certificate_key /etc/nginx/ssl-cert-path/fearby.key;
        ssl_dhparam /etc/nginx/ssl-cert-path/dhparams4096.pem;

        # HTTPS Ciphers

        # TLS 1.2
        ssl_protocols TLSv1.2;
        ssl_prefer_server_ciphers on;
        ssl_ciphers "EECDH+AESGCM:EDH+AESGCM:AES256+EECDH:AES256+EDH";

        # TLS 1.3     #todo
        # ssl_ciphers
        # ECDHE-RSA-AES256-GCM-SHA512:DHE-RSA-AES256-GCM-SHA512:ECDHE-RSA-AES256-GCM-SHA384:DHE-RSA-AES256-GCM-SHA384:ECDHE-RSA-AES256-SHA384:ECDHE-RSA-AES128-GCM-SHA256:ECDHE-ECDSA-AES128-GCM-SHA256:DES-CBC3-SHA;
        # ssl_ecdh_curve secp384r1;

        # Force HTTPS
        if ($scheme != "https") {
                return 301 https://$host$request_uri;
        }

        # HTTPS Settings
        server_tokens off;
        ssl_session_cache shared:SSL:10m;
        ssl_session_timeout 30m;
        ssl_session_tickets off;
        add_header Strict-Transport-Security "max-age=63072000; includeSubdomains; preload";
        add_header X-Frame-Options DENY;
        add_header X-Content-Type-Options nosniff;
        add_header X-XSS-Protection "1; mode=block";
  #ssl_stapling on;             # Requires nginx >= 1.3.7

        # Cloudflare DNS
        resolver 1.1.1.1 1.0.0.1 valid=60s;
        resolver_timeout 1m;

        # PHP Memory
        fastcgi_param PHP_VALUE "memory_limit = 1024M";

  # pass the PHP scripts to FastCGI server listening on 127.0.0.1:9000
        location ~ .php$ {
            try_files $uri =404;
            # include snippets/fastcgi-php.conf;

            fastcgi_split_path_info ^(.+.php)(/.+)$;
            fastcgi_index index.php;
            fastcgi_param SCRIPT_FILENAME $document_root$fastcgi_script_name;
            include fastcgi_params;
            fastcgi_pass unix:/run/php/php7.2-fpm.sock;

            # NOTE: You should have "cgi.fix_pathinfo = 0;" in php.ini
            # fastcgi_pass 127.0.0.1:9000;
      }

        location / {
            # try_files $uri $uri/ =404;
            try_files $uri $uri/ /index.php?q=$uri&$args;
            index index.php index.html index.htm;
            proxy_set_header Proxy "";
        }

        # Deny Rules
        location ~ /.ht {
                deny all;
        }
        location ~ ^/.user.ini {
            deny all;
        }
        location ~ (.ini) {
            return 403;
        }

        # Headers
        location ~* .(?:ico|css|js|gif|jpe?g|png|js)$ {
            expires 30d;
            add_header Pragma public;
            add_header Cache-Control "public";
        }

}
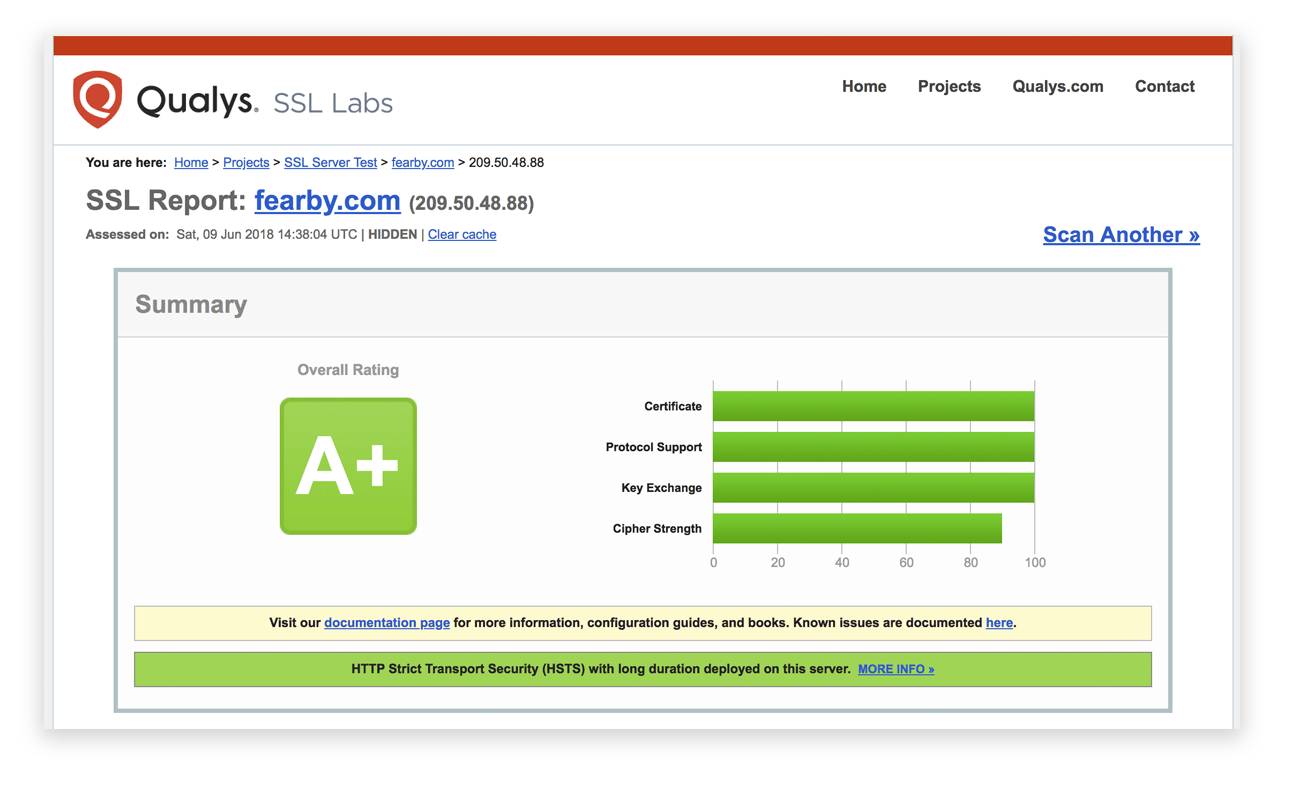
SSL Labs SSL Certificate Check
All good thanks to the config above.
Install WP-CLI
I don’t like setting up FTP to auto-update WordPress plugins. I use the WP-CLI tool to manage WordPress installations by the command line. Read my blog here on using WP-CLI.
Download WP-CLI
mkdir /utils
cd /utils
curl -O https://raw.githubusercontent.com/wp-cli/builds/gh-pages/phar/wp-cli.phar
Move WP-CLI to the bin folder as “wp”
chmod +x wp-cli.phar
sudo mv wp-cli.phar /usr/local/bin/wp
Test wp
wp --info
OS: Linux 4.15.0-22-generic #24-Ubuntu SMP Wed May 16 12:15:17 UTC 2018 x86_64
Shell: /bin/bash
PHP binary: /usr/bin/php7.2
PHP version: 7.2.5-1+ubuntu18.04.1+deb.sury.org+1
php.ini used: /etc/php/7.2/cli/php.ini
WP-CLI root dir: phar://wp-cli.phar
WP-CLI vendor dir: phar://wp-cli.phar/vendor
WP_CLI phar path: /www-root
WP-CLI packages dir:
WP-CLI global config:
WP-CLI project config:
WP-CLI version: 1.5.1
Update WordPress Plugins
Now I can run “wp plugin update” to update all WordPress plugins
wp plugin update
Enabling Maintenance mode...
Downloading update from https://downloads.wordpress.org/plugin/wordfence.7.1.7.zip...
Unpacking the update...
Installing the latest version...
Removing the old version of the plugin...
Plugin updated successfully.
Downloading update from https://downloads.wordpress.org/plugin/wp-meta-seo.3.7.1.zip...
Unpacking the update...
Installing the latest version...
Removing the old version of the plugin...
Plugin updated successfully.
Downloading update from https://downloads.wordpress.org/plugin/wordpress-seo.7.6.1.zip...
Unpacking the update...
Installing the latest version...
Removing the old version of the plugin...
Plugin updated successfully.
Disabling Maintenance mode...
Success: Updated 3 of 3 plugins.
+---------------+-------------+-------------+---------+
| name | old_version | new_version | status |
+---------------+-------------+-------------+---------+
| wordfence | 7.1.6 | 7.1.7 | Updated |
| wp-meta-seo | 3.7.0 | 3.7.1 | Updated |
| wordpress-seo | 7.5.3 | 7.6.1 | Updated |
+---------------+-------------+-------------+---------+
Update WordPress Core
WordPress core file can be updated with “wp core update“
wp core update
Success: WordPress is up to date.
Troubleshooting: Use the flag “–allow-root “if wp needs higher access (unsafe action though).
Install PHP Child Workers
I edited the following file to setup PHP child workers /etc/php/7.2/fpm/pool.d/www.conf
Changes
> pm = dynamic
> pm.max_children = 40
> pm.start_servers = 15
> pm.min_spare_servers = 5
> pm.max_spare_servers = 15
> pm.process_idle_timeout = 30s;
> pm.max_requests = 500;
> php_admin_value[error_log] = /var/log/www-fpm-php.www.log
> php_admin_value[memory_limit] = 512M
Restart PHP
sudo service php7.2-fpm restart
Test NGINX config, reload NGINX config and restart NGINX
nginx -t
nginx -s reload
/etc/init.d/nginx restart
Output (14 workers are ready)
Check PHP Child Worker Status

sudo service php7.2-fpm status
* php7.2-fpm.service - The PHP 7.2 FastCGI Process Manager
Loaded: loaded (/lib/systemd/system/php7.2-fpm.service; enabled; vendor preset: enabled)
Active: active (running) since Thu 2018-06-07 19:32:47 AEST; 20s ago
Docs: man:php-fpm7.2(8)
Main PID: # (php-fpm7.2)
Status: "Processes active: 0, idle: 15, Requests: 2, slow: 0, Traffic: 0.1req/sec"
Tasks: 16 (limit: 2322)
CGroup: /system.slice/php7.2-fpm.service
|- # php-fpm: master process (/etc/php/7.2/fpm/php-fpm.conf)
|- # php-fpm: pool www
|- # php-fpm: pool www
|- # php-fpm: pool www
|- # php-fpm: pool www
|- # php-fpm: pool www
|- # php-fpm: pool www
|- # php-fpm: pool www
|- # php-fpm: pool www
|- # php-fpm: pool www
|- # php-fpm: pool www
|- # php-fpm: pool www
|- # php-fpm: pool www
|- # php-fpm: pool www
|- # php-fpm: pool www
- # php-fpm: pool www
Memory Tweak (set at your own risk)
sudo nano /etc/sysctl.conf
vm.swappiness = 1
Setting swappiness to a value of 1 all but disables the swap file and tells the Operating System to aggressively use ram, a value of 10 is safer. Only set this if you have enough memory available (and free).
Possible swappiness settings:
> vm.swappiness = 0 Swap is disabled. In earlier versions, this meant that the kernel would swap only to avoid an out of memory condition when free memory will be below vm.min_free_kbytes limit, but in later versions, this is achieved by setting to 1.[2]> vm.swappiness = 1 Kernel version 3.5 and over, as well as Red Hat kernel version 2.6.32-303 and over: Minimum amount of swapping without disabling it entirely.
> vm.swappiness = 10 This value is sometimes recommended to improve performance when sufficient memory exists in a system.[3]
> vm.swappiness = 60 The default value.
> vm.swappiness = 100 The kernel will swap aggressively.
The “htop” tool is a handy memory monitoring tool to “top”
Also, you can use good old “watch” command to show near-live memory usage (auto-refreshes every 2 seconds)
watch -n 2 free -m
Script to auto-clear the memory/cache
As a habit, I am setting up a cronjob to check when free memory falls below 100MB, then the cache is automatically cleared (freeing memory).
Script Contents: clearcache.sh
#!/bin/bash

# Script help inspired by https://unix.stackexchange.com/questions/119126/command-to-display-memory-usage-disk-usage-and-cpu-load
ram_use=$(free -m)
IFS=
I set the cronjob to run every 15 mins, I added this to my cronjob.
SHELL=/bin/bash
*/15  *  *  *  *  root /bin/bash /scripts/clearcache.sh >> /scripts/clearcache.log
Sample log output
2018-06-10 01:13:22 RAM OK (Total: 1993 MB, Used: 981 MB, Free: 387 MB)
2018-06-10 01:15:01 RAM OK (Total: 1993 MB, Used: 974 MB, Free: 394 MB)
2018-06-10 01:20:01 RAM OK (Total: 1993 MB, Used: 955 MB, Free: 412 MB)
2018-06-10 01:25:01 RAM OK (Total: 1993 MB, Used: 1002 MB, Free: 363 MB)
2018-06-10 01:30:01 RAM OK (Total: 1993 MB, Used: 970 MB, Free: 394 MB)
2018-06-10 01:35:01 RAM OK (Total: 1993 MB, Used: 963 MB, Free: 400 MB)
2018-06-10 01:40:01 RAM OK (Total: 1993 MB, Used: 976 MB, Free: 387 MB)
2018-06-10 01:45:01 RAM OK (Total: 1993 MB, Used: 985 MB, Free: 377 MB)
2018-06-10 01:50:01 RAM OK (Total: 1993 MB, Used: 983 MB, Free: 379 MB)
2018-06-10 01:55:01 RAM OK (Total: 1993 MB, Used: 979 MB, Free: 382 MB)
2018-06-10 02:00:01 RAM OK (Total: 1993 MB, Used: 980 MB, Free: 380 MB)
2018-06-10 02:05:01 RAM OK (Total: 1993 MB, Used: 971 MB, Free: 389 MB)
2018-06-10 02:10:01 RAM OK (Total: 1993 MB, Used: 983 MB, Free: 376 MB)
2018-06-10 02:15:01 RAM OK (Total: 1993 MB, Used: 967 MB, Free: 392 MB)
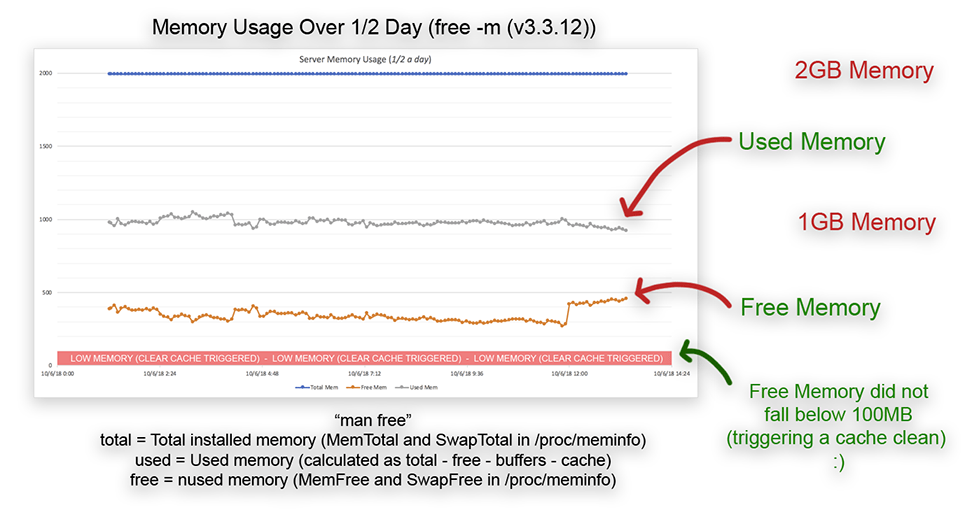
I will check the log (/scripts/clearcache.log) in a few days and view the memory trends.
After 1/2 a day Ubuntu 18.04 is handling memory just fine, no externally triggered cache clears have happened 🙂
I used https://crontab.guru/every-hour to set the right schedule in crontab.
I rebooted the VM.
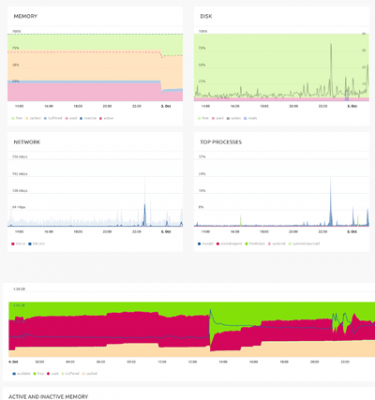
Update: I now use Nixstats monitoring
Swap File
FYI: Here is a handy guide on viewing swap file usage here. I’m not using swap files so it is only an aside.
After the system rebooted I checked if the swappiness setting was active.
sudo cat /proc/sys/vm/swappiness
1
Yes, swappiness is set.
File System Tweaks – Write Back Cache (set at your own risk)
First, check your disk name and file system
sudo lsblk -o NAME,FSTYPE,SIZE,MOUNTPOINT,LABEL
Take note of your disk name (e.g vda1)
I used TuneFS to enable writing data to the disk before writing to the journal. tunefs is a great tool for setting file system parameters.
Warning (snip from here): “I set the mode to journal_data_writeback. This basically means that data may be written to the disk before the journal. The data consistency guarantees are the same as the ext3 file system. The downside is that if your system crashes before the journal gets written then you may lose new data — the old data may magically reappear.“
Warning this can corrupt your data. More information here.
I ran this command.
tune2fs -o journal_data_writeback /dev/vda1
I edited my fstab to append the “writeback,noatime,nodiratime” flags for my volume after a reboot.
Edit FS Tab:
sudo nano /etc/fstab
I added “writeback,noatime,nodiratime” flags to my disk options.
# /etc/fstab: static file system information.
#
# Use 'blkid' to print the universally unique identifier for a
# device; this may be used with UUID= as a more robust way to name devices
# that works even if disks are added and removed. See fstab(5).
#
#
# / was on /dev/vda1 during installation
#
UUID=xxxxxxxx-xxxx-xxxx-xxxx-xxxxxxxxxxxx /               ext4    errors=remount-ro,data=writeback,noatime,nodiratime   0       1
Updating Ubuntu Packages
Show updatable packages.
Update Packages.
Unattended Security Updates
Read more on Ubuntu 18.04 Unattended upgrades here, here and here.
Install Unattended Upgrades
Enable Unattended Upgrades.
Now I configure what packages not to auto-update.
Edit /etc/apt/apt.conf.d/50unattended-upgrades
Find “Unattended-Upgrade::Package-Blacklist” and add packages that you don’t want automatically updated, you may want to manually update these (and monitor updates).
I prefer not to auto-update critical system apps (I will do this myself).
FYI: You can find installed packages by running this command:
Enable automatic updates by editing /etc/apt/apt.conf.d/20auto-upgrades
Edit the number at the end (the number is how many days to wait before updating) of each line.
> APT::Periodic::Update-Package-Lists “1”;
> APT::Periodic::Download-Upgradeable-Packages “1”;
> APT::Periodic::AutocleanInterval “7”;
> APT::Periodic::Unattended-Upgrade “1”;
Set to “0” to disable automatic updates.
The results of unattended-upgrades will be logged to /var/log/unattended-upgrades
Update packages now.
Almost done.
I Rebooted
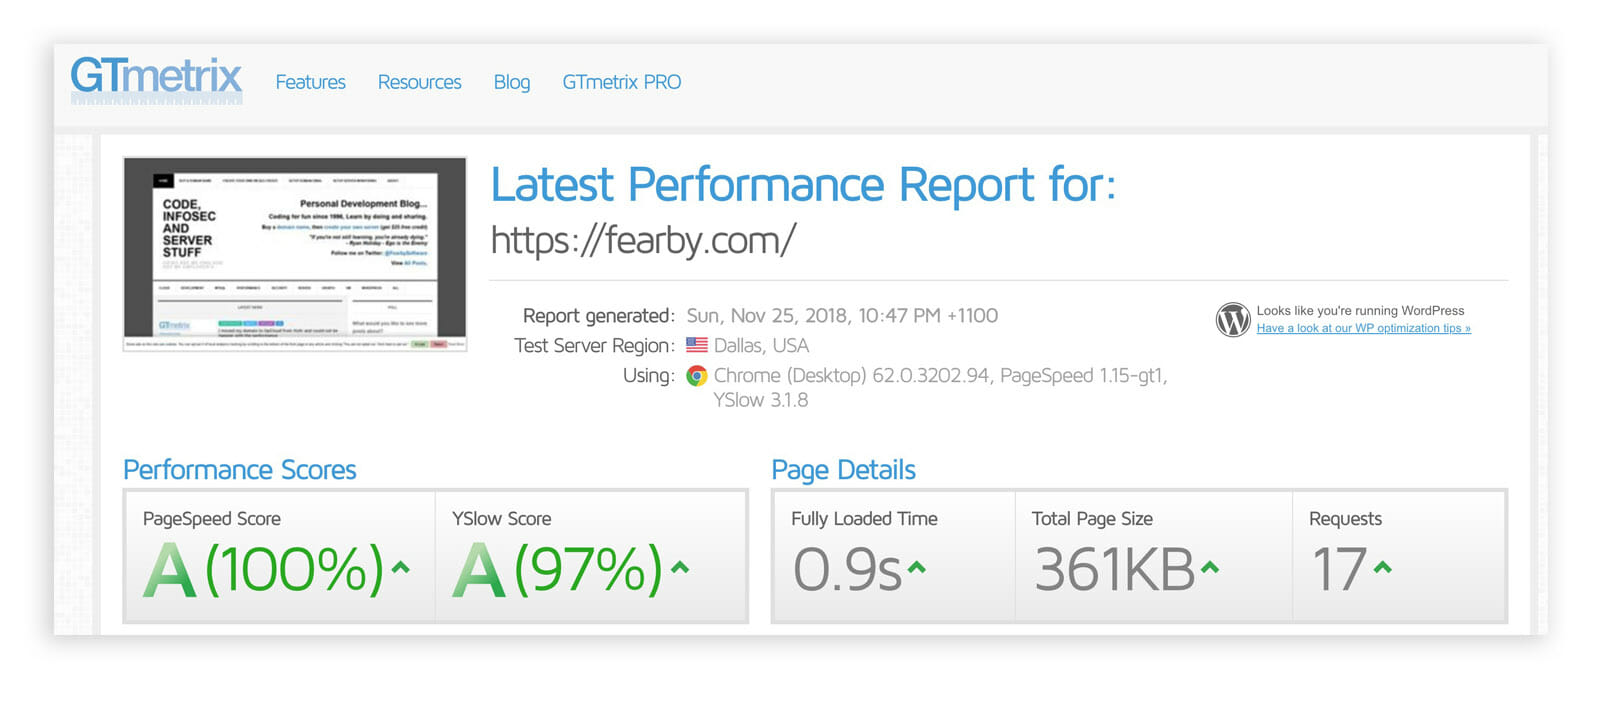
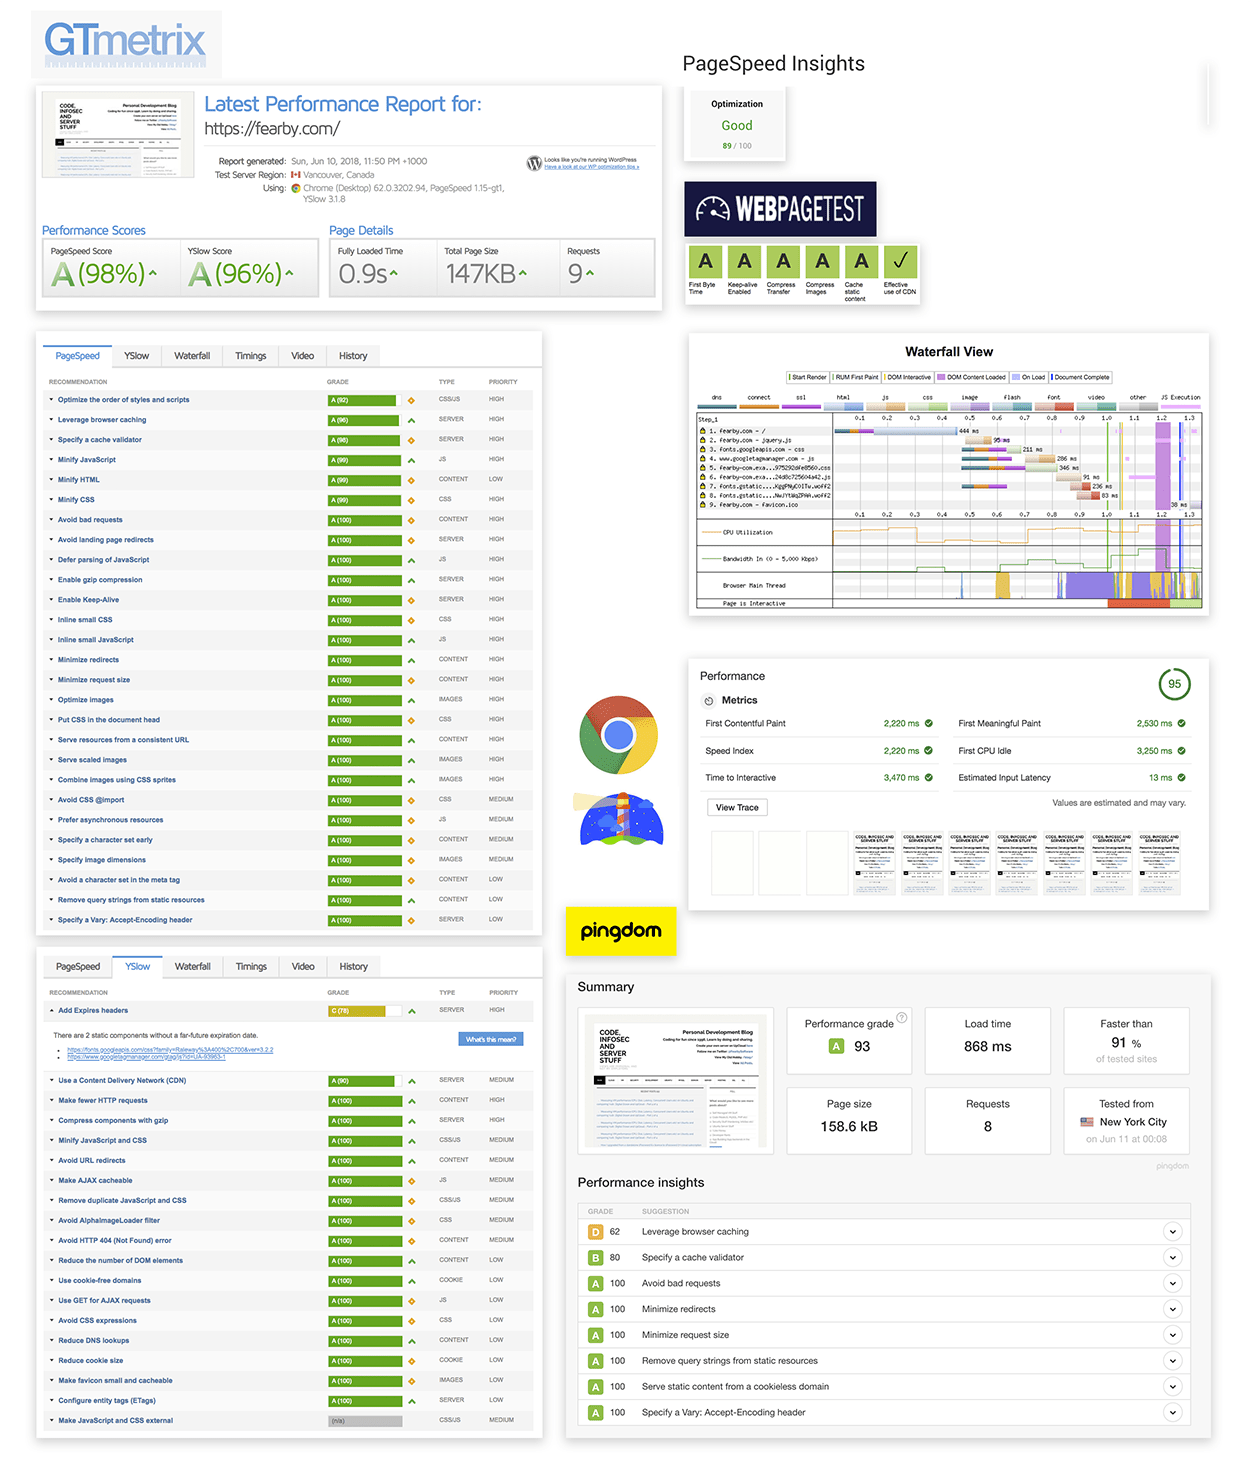
GT Metrix Score
I almost fell off my chair. It’s an amazing feeling hitting refresh in GT Metrix and getting sub-2-second score consistently (and that is with 17 assets loading and 361KB of HTML content)
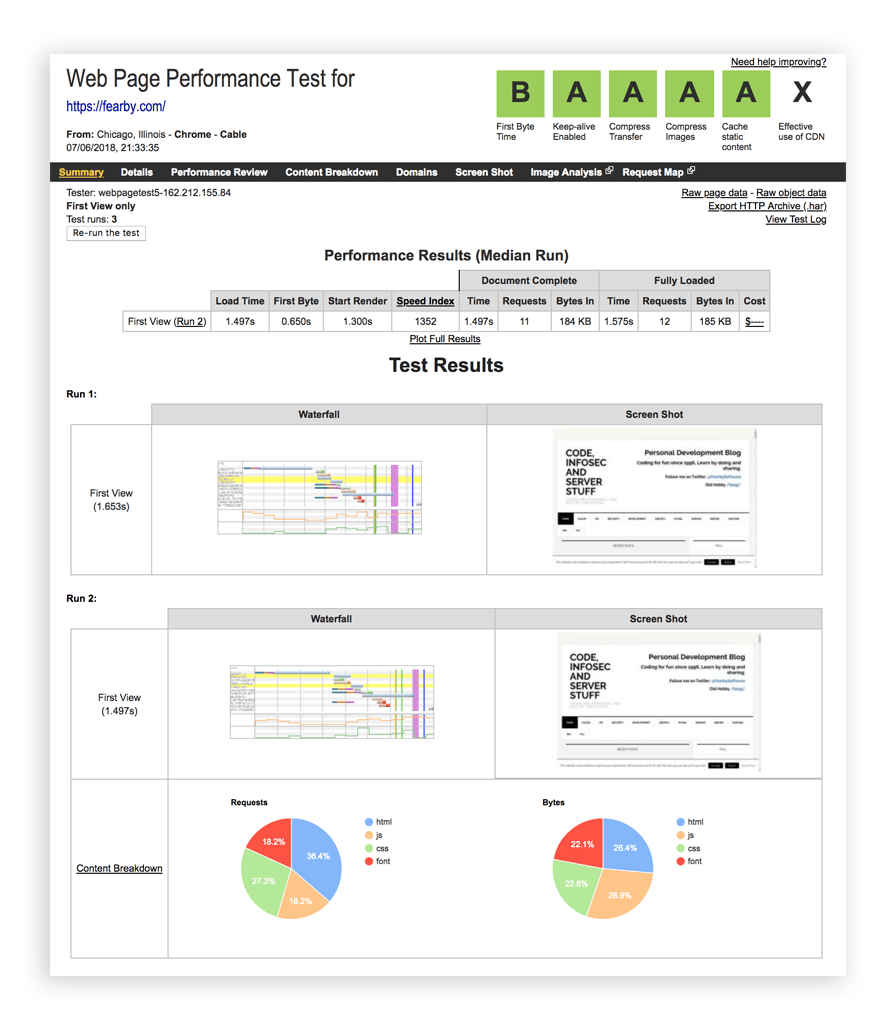
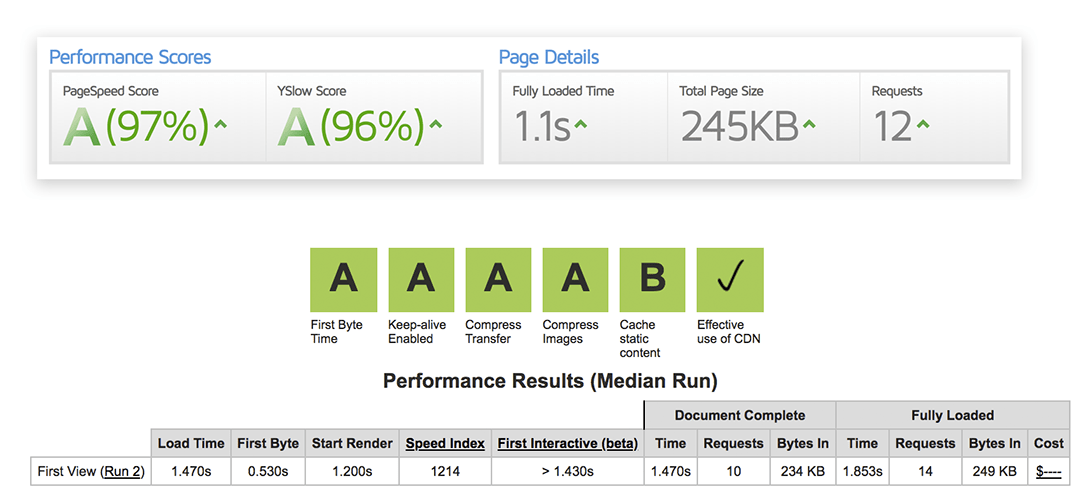
WebPageTest.org Test Score
Nice. I am not sure why the effective use of CDN has an X rating as I have the EWWW CDN and Cloudflare. First Byte time is now a respectable “B”, This was always bad.
Update: I found out the longer you set cache delays in Cloudflare the higher the score.
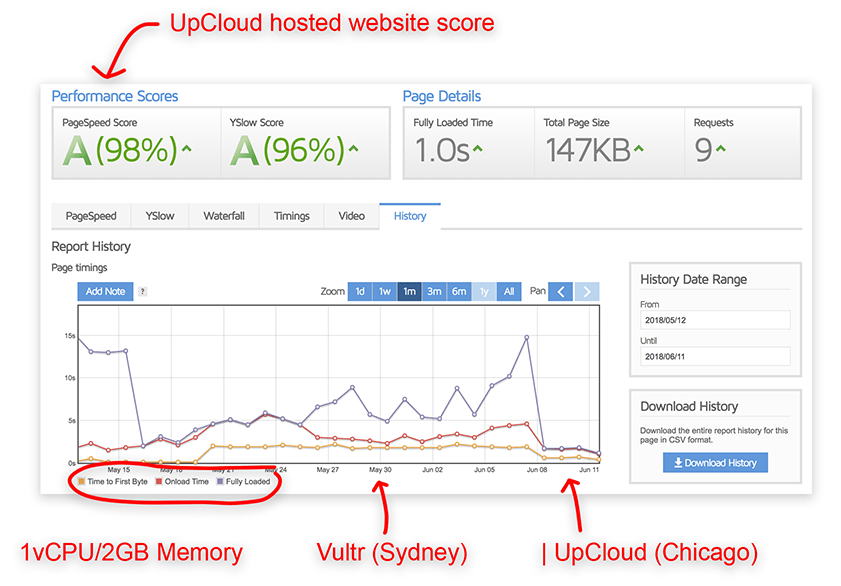
GT Metrix has a nice historical breakdown of load times (night and day).
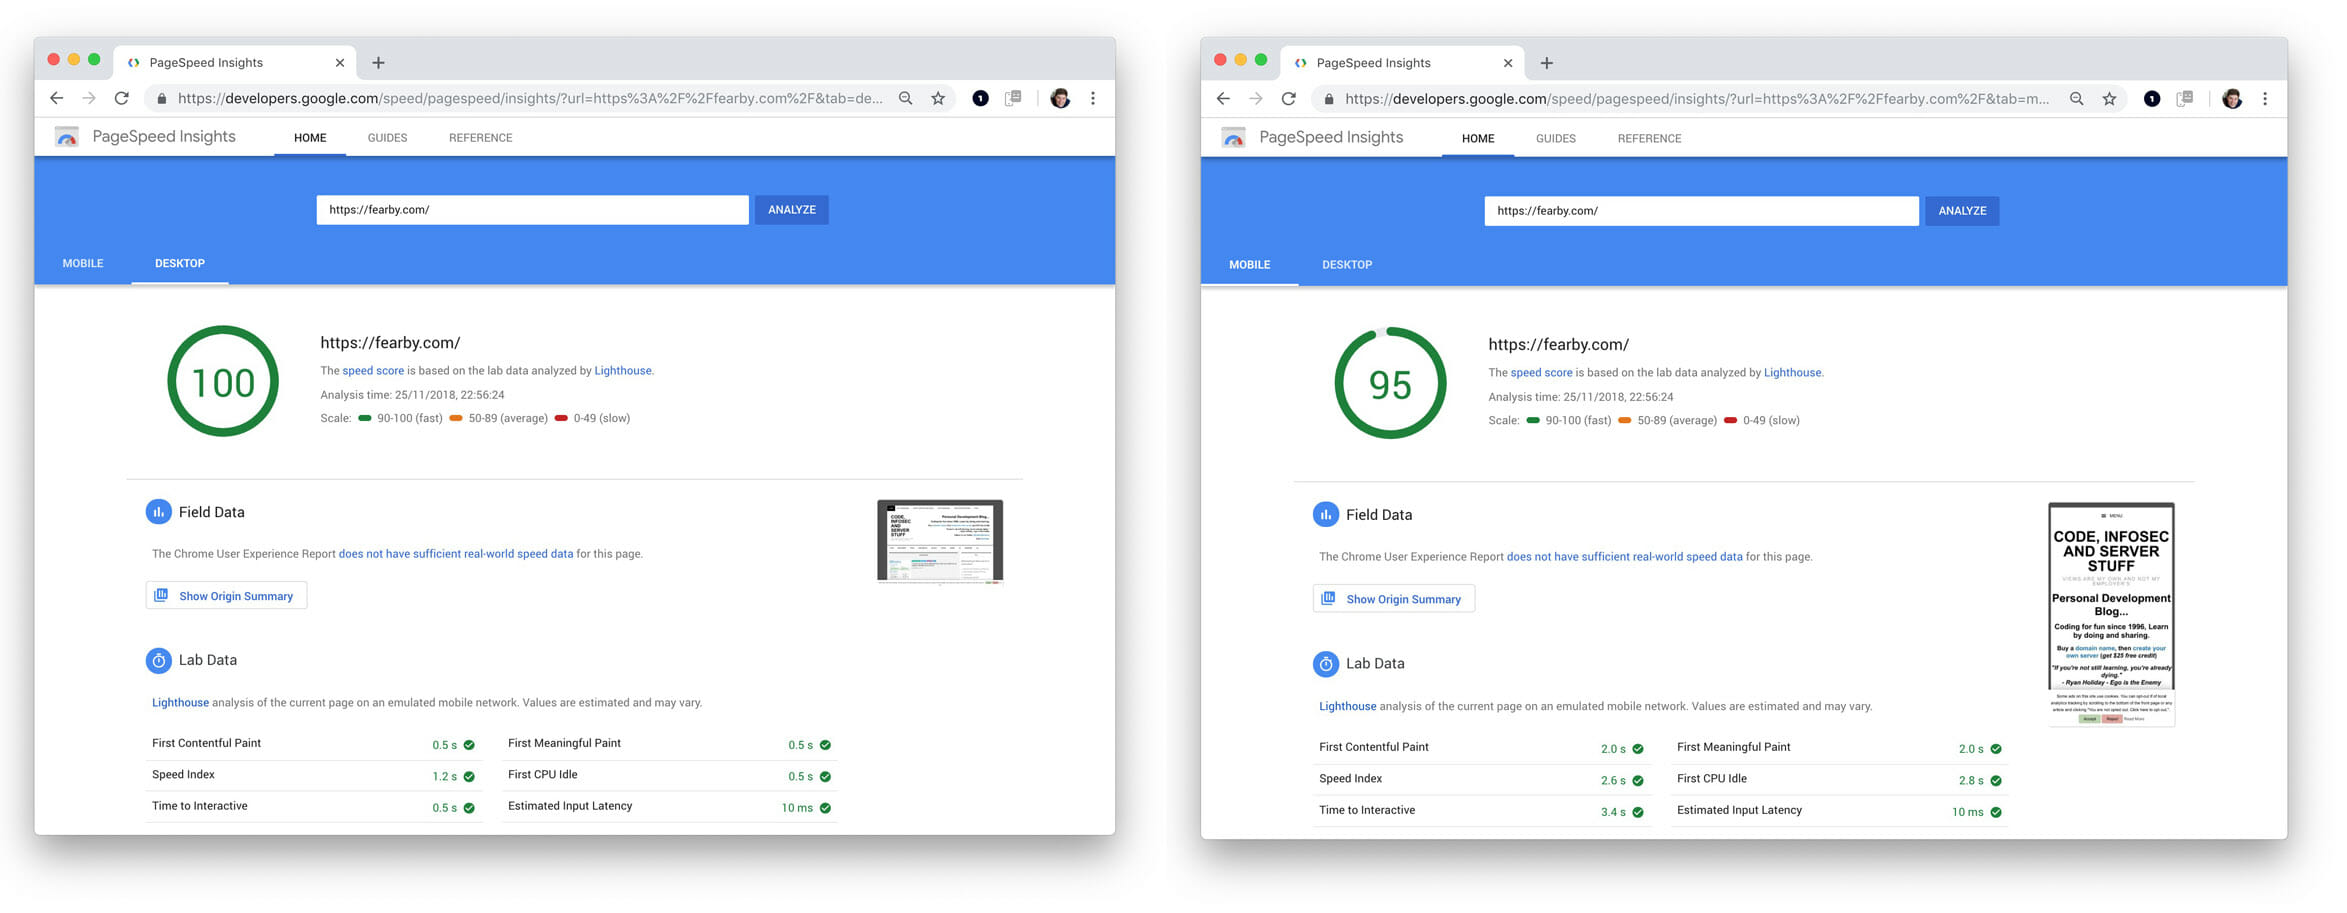
Google Page Speed Insight Desktop Score
I benchmarked with https://developers.google.com/speed/pagespeed/insights/
This will help with future SEO rankings. It is well known that Google is pushing fast servers.
Google Chrome 70 Dev Console Audit (Desktop)

This is amazing, I never expected to get this high score. I know Google like (and are pushing) sub-1-second scores.
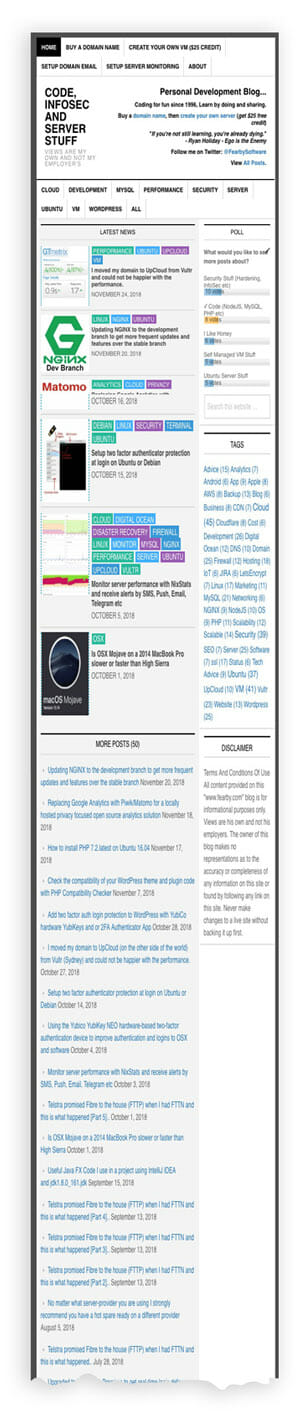
My site is loading so well it is time I restored some old features that were too slow on other servers
- I disabled Lazy loading of images (this was not working on some Android devices)
- I re-added the News Widget and news images.
GTMetrix and WebpageTest sores are still good (even after adding bloat)
My WordPress site is not really that small either
FYI: WordPress Plugins I use.
These are the plugins I use.
- Autoptimize – Optimises your website, concatenating the CSS and JavaScript code, and compressing it.
- BJ Lazy Load (Now Disabled) – Lazy image loading makes your site load faster and saves bandwidth.
- Cloudflare – Cloudflare speeds up and protects your WordPress site.
- Contact Form 7 – Just another contact form plugin. Simple but flexible.
- Contact Form 7 Honeypot – Add honeypot anti-spam functionality to the popular Contact Form 7 plugin.
- Crayon Syntax Highlighter – Supports multiple languages, themes, highlighting from a URL, local file or post text.
- Democracy Poll – Allows creating democratic polls. Visitors can vote for more than one answer & add their own answers.
- Display Posts Shortcode – Display a listing of posts using the
- How to power up a Tesla with a dead low voltage battery
- EV Fear, Uncertainty and Doubt
- Efergy E-Max Wireless Energy Monitor from Reduction Revolution
- Migrating my website from Upcloud to Linode -Akamai
- Charging an EV
- Is an EV A Good Idea For Me?
- Teslogic.co dashboard for Teslas
- Tesla Model Y Ownership after 7 Months in Australia
- Automated Tesla charging at home for 8c per kWh via Origin Energy
- Electric Car Adventures – Our journey on a long road trip
- EWWW Image Optimizer – Reduce file sizes for images within WordPress including NextGEN Gallery and GRAND FlAGallery. Uses jpegtran, optipng/pngout, and gifsicle.
- GDPR Cookie Consent – A simple way to show that your website complies with the EU Cookie Law / GDPR.
- GTmetrix for WordPress – GTmetrix can help you develop a faster, more efficient, and all-around improved website experience for your users. Your users will love you for it.
- TinyMCE Advanced – Enables advanced features and plugins in TinyMCE, the visual editor in WordPress.
- Wordfence Security – Anti-virus, Firewall and Malware Scan
- WP Meta SEO – WP Meta SEO is a plugin for WordPress to fill meta for content, images and main SEO info in a single view.
- WP Performance Score Booster – Speed-up page load times and improve website scores in services like PageSpeed, YSlow, Pingdom and GTmetrix.
- WP SEO HTML Sitemap – A responsive HTML sitemap that uses all of the settings for your XML sitemap in the WordPress SEO by Yoast Plugin.
- WP-Optimize – WP-Optimize is WordPress’s #1 most installed optimisation plugin. With it, you can clean up your database easily and safely, without manual queries.
- WP News and Scrolling Widgets Pro – WP News Pro plugin with six different types of shortcode and seven different types of widgets. Display News posts with various designs.
- Yoast SEO – The first true all-in-one SEO solution for WordPress, including on-page content analysis, XML sitemaps and much more.
- YouTube – YouTube Embed and YouTube Gallery WordPress Plugin. Embed a responsive video, YouTube channel, playlist gallery, or live stream
How I use these plugins to speed up my site.
- I use EWWW Image Optimizer plugin to auto-compress my images and to provide a CDN for media asset deliver (pre-Cloudflare). Learn more about ExactDN and EWWW.io here.
- I use Autoptimize plugin to optimise HTML/CSS/JS and ensure select assets are on my EWWW CDN. This plugin also removes WordPress Emojis, removed the use of Google Fonts, allows you to define pre-configured domains, Async Javascript-files etc.
- I use BJ Lazy Load to prevent all images in a post from loading on load (and only as the user scrolls down the page).
- GTmetrix for WordPress and Cloudflare plugins are for information only?
- I use WP-Optimize to ensure my database is healthy and to disable comments/trackbacks and pingbacks.
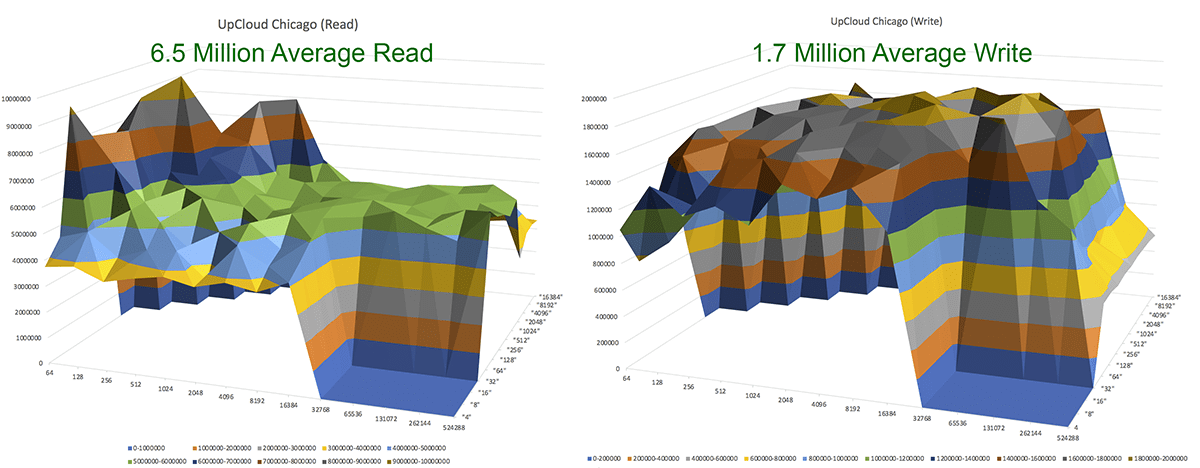
Let’s Test UpCloud’s Disk IO in Chicago
Looks good to me, Read IO is a little bit lower than UpCloud’s Singapore data centre but still, it’s faster than Vultr. I can’t wait for more data centres to become available around the world.
Why is UpCloud Disk IO so good?
I asked UpCloud on Twitter why the Disk IO was so good.
- “MaxIOPS is UpCloud’s proprietary block-storage technology. MaxIOPS is physically redundant storage technology where all customer’s data is located in two separate physical devices at all times. UpCloud uses InfiniBand (!) network to connect storage backends to compute nodes, where customers’ cloud servers are running. All disks are enterprise-grade SSD’s. And using separate storage backends, it allows us to live migrate our customers’ cloud servers freely inside our infrastructure between compute nodes – whether it be due to hardware malfunction (compute node) or backend software updates (example CPU vulnerability and immediate patching).“
My Answers to Questions to support
Q1) What’s the difference between backups and snapshots (a Twitter user said Snapshots were a thing)
A1) Backups and snapshots are the same things with our infrastructure.
Q2) What are charges for backup of a 50GB drive?
A2) We charge $0.06 / GB of the disk being captured. But capture the whole disk, not just what was used. So for a 50GB drive, we charge $0.06 * 50 = $3/month. Even if 1GB were only used.
- Support confirmed that each backup is charged (so 5 times manual backups are charged 5 times). Setting up a daily auto backup schedule for 2 weeks would create 14 billable backup charges.
- I guess a 25GB server will be $1.50 a month
Q3) What are data charges if I go over my 2TB quota?
A3) Outgoing data charges are $0.056/GB after the pre-configured allowance.
Q4) What happens if my balance hits $0?
A4) You will get notification of low account balance 2 weeks in advance based on your current daily spend. When your balance reaches zero, your servers will be shut down. But they will still be charged for. You can automatically top-up if you want to assign a payment type from your Control Panel. You deposit into your balance when you want. We use a prepaid model of payment, so you need to top up before using, not billing you after usage. We give you lots of chances to top-up.
Support Tips
- One thing to note, when deleting servers (CPU, RAM) instances, you get the option to delete the storages separately via a pop-up window. Choose to delete permanently to delete the disk, to save credit. Any disk storage lying around even unattached to servers will be billed.
- Charges are in USD.
I think it’s time to delete my domain from Vultr in Sydney.
Deleted my Vultr domain
I deleted my Vultr domain.
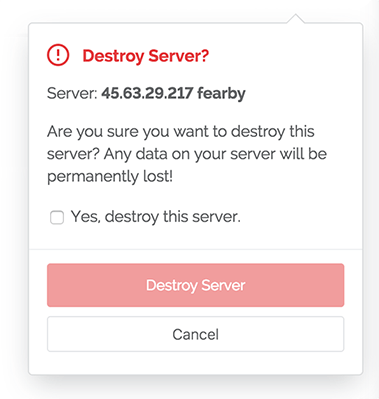
Done.
More Reading on UpCloud
https://www.upcloud.com/documentation/faq/
UpCloud Server Status
Check out my new guide on Nixstats for awesome monitoring
What I would like
- Ability to name individual manual backups (tag with why I backed up).
- Ability to push user-defined data from my VM to the dashboard
- Cheaper scheduled backups
- Sydney data centres (one day)
Update: Post UpCloud Launch Tweaks (Awesome)
I had a look at https://www.webpagetest.org/ results to see where else I can optimise webpage delivery.
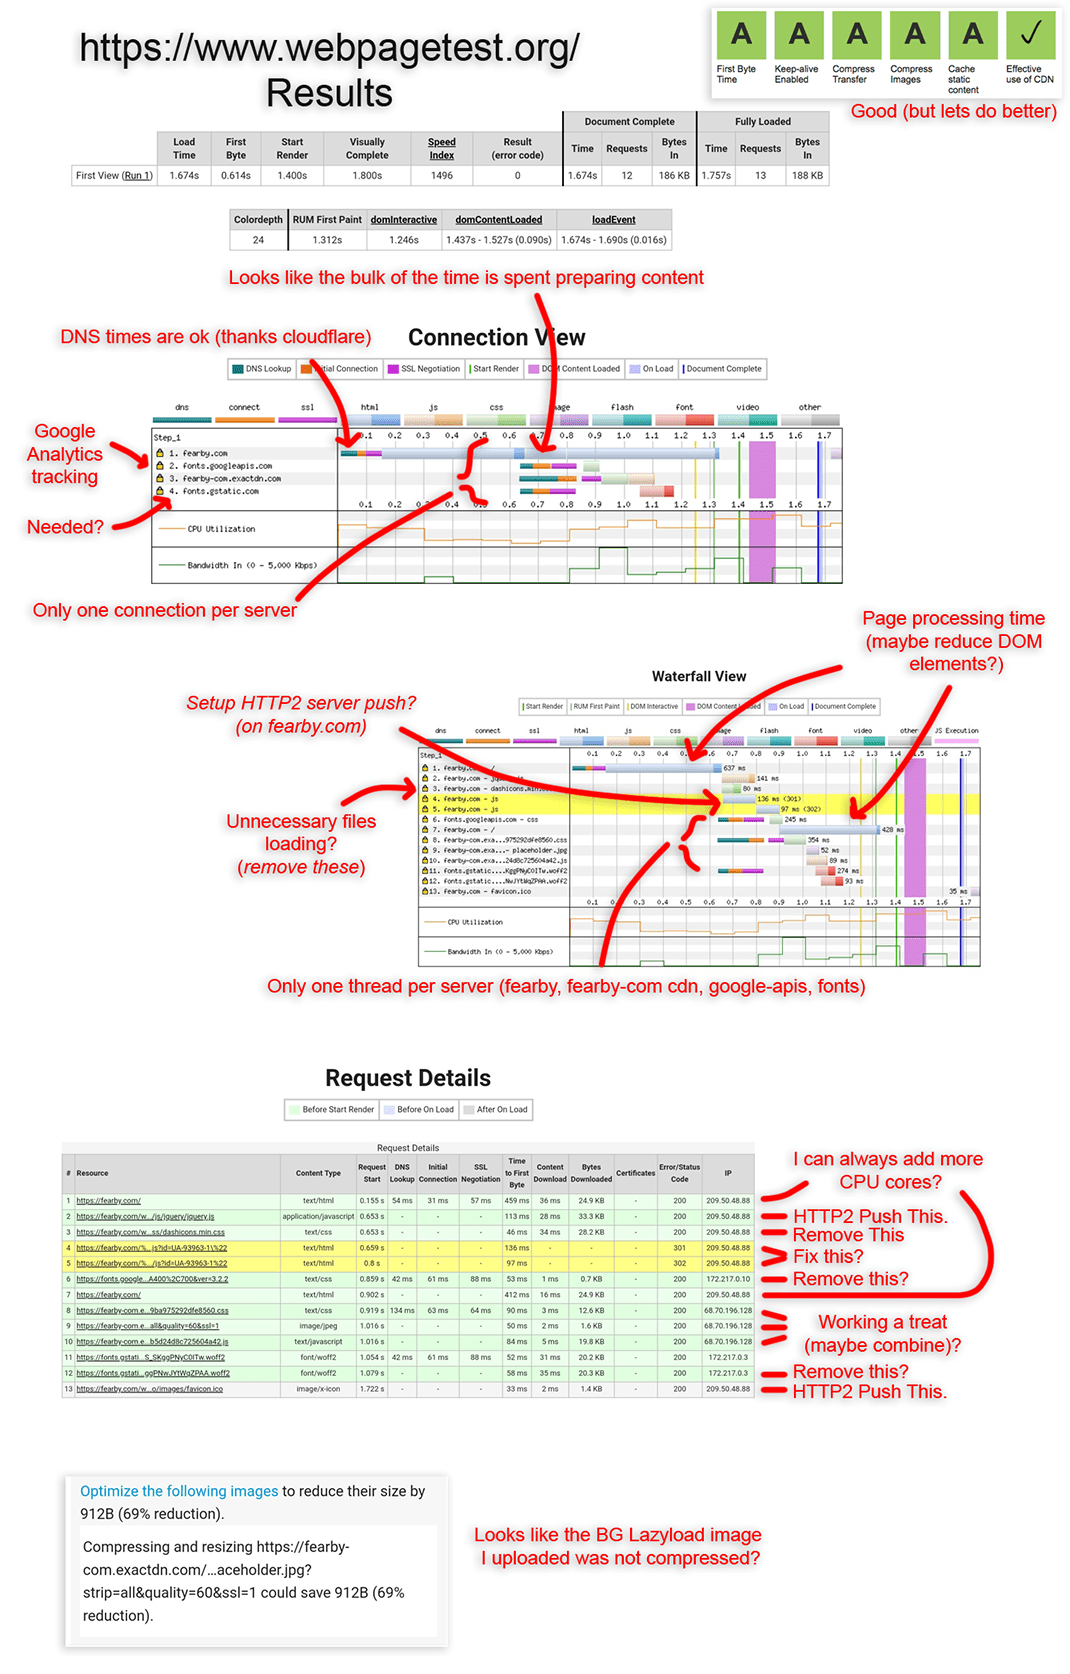
Disable dasjhicons.min.css (for unauthenticated WordPres
Find functions.php in the www root
Edit functions.php
Add the following
// Remove dashicons in frontend for unauthenticated users
add_action( 'wp_enqueue_scripts', 'bs_dequeue_dashicons' );
function bs_dequeue_dashicons() {
    if ( ! is_user_logged_in() ) {
        wp_deregister_style( 'dashicons' );
    }
}
HTTP2 Push
- Introducing HTTP/2 Server Push with NGINX 1.13.9 | NGINX
- How To Set Up Nginx with HTTP/2 Support on Ubuntu 16.04 | DigitalOcean
I added http2 to my listening servers
I tested a http2 push page by defining this in /etc/nginx/sites-available/default
Once I tested that push (demo here) was working I then defined two files to push that were being sent from my server
I used the WordPress Plugin Autoptimize to remove Google font usage (this removed a number of files being loaded when my page loads).
I used the WordPress Plugin WP-Optimize plugin into to remove comments and disable pingbacks and trackbacks.
WordPress wp-config.php tweaks
Add 2FA Authentication to server logins.
I recently checked out YubiCo YubiKeys and I have secured my Linux servers with 2FA prompts at login. Read the guide here. I secured my WordPress too.
Tweaks Todo
- Compress placeholder BJ Lazy Load Image (plugin is broken)
- Solve 2x Google Analytics tracker redirects (done, switched to Matomo)
Conclusion
I love UpCloud’s fast servers, give them a go (use my link and get $25 free credit).
I love Cloudflare for providing a fast CDN.
I love ewww.io’s automatic Image Compression and Resizing plugin that automatically handles image optimisations and pre Cloudflare/first hit CDN caching.
Read my post about server monitoring with Nixstats here.
Let the results speak for themselves (sub <1 second load times).
I hope this guide helps someone.
Please consider using my referral code and get $25 credit for free.
https://www.upcloud.com/register/?promo=D84793
2020 Update. I have stopped using Putty and WinSCP. I now use MobaXterm (a tabbed SSH client for Windows) as it is way faster than WinSCP and better than Putty. Read my review post of MobaXTerm here.
Ask a question or recommend an article
[contact-form-7 id=”30″ title=”Ask a Question”]
Revision History
v2.1 Newer GTMetrix scores
v2.0 New UpCloud UI Update and links to new guides.
v1.9 Spelling and grammar
v1.8 Trial mode gotcha (deposit money ASAP)
v1.7 Added RSA Private key info
v1.7 – Added new firewall rules info.
v1.6 – Added more bloat to the site, still good.
v1.5 Improving Accessibility
v1.4 Added Firewall Price
v1.3 Added wp-config and plugin usage descriptions.
v1.2 Added GTMetrix historical chart.
v1.1 Fixed free typos and added final conclusion images.
v1.0 Added final results
v0.9 added more tweaks (http2 push, removing unwanted files etc)
v0.81 Draft – Added memory usage chart and added MaxIOPS info from UpCloud.
v0.8 Draft post.
v2.0